0x01 Preface
After kail linux was updated to 2020, it moved closer to a normal desktop system. Previously, it initially had only the root user, but now it starts with a regular user, haha. I install this system all the time, so this time I am recording everything that needs to be done after installation, so I will not have to look up the information the next time I install it.
0x02 Getting Started (The Steps Below Are Performed After Installation and Login) (The Installation Itself Is Just Clicking Next, So I Will Not Record It)
-
Repair the win10 Boot Entry (For Dual-Boot Users)
If you install a dual-boot system on win10 with kail linux as the other system (as I did), you may find that the win10 boot entry is missing after installing kail linux. Do not panic. Boot into kail linux, open a terminal, and enter sudo grub-mkconfig -o /boot/grub/grub.cfg to repair the win10 boot entry.
Restart the computer, and you will see both kail and win10 options.
-
Configure Software Repositories and Update System Software
- Because kail added a regular user and logs in as that regular user by default, use the sudo command when modifying system files such as /etc/apt/sources.list.
sudo vim /etc/apt/sources.listAfter opening it, comment out the original software repository and add the new repository. The following is the new Alibaba repository.
deb http://mirrors.aliyun.com/kali kali-rolling main non-free contrib
deb-src http://mirrors.aliyun.com/kali kali-rolling main non-free contrib
- Save and exit, then enter the following two commands to update the system software.
apt-get updateapt-get upgradeDone!
-
Set a Keyboard Shortcut for Opening the Terminal
Every time you open the terminal, you have to right-click and select open teminal. It is better to set a keyboard shortcut that opens the terminal directly. Click Settings in the upper-right corner, select Keyboard Shortcuts, and then add one, as shown below:
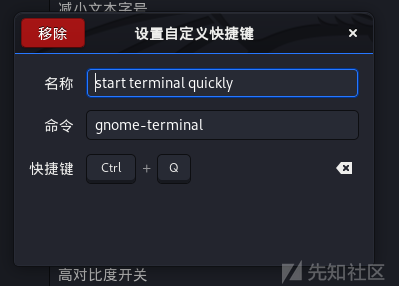 Done!
Done!
-
Install a Chinese Input Method (Two Methods)
- First method (only for systems whose default language is Chinese)
First uninstall ibus, because the fcitx input method conflicts with it: sudo apt-get remove ibus
Then install fcitx Pinyin.
sudo apt-get install fcitx fcitx-pinyin fcitx-module-cloudpinyin fcitx-googlepinyin
Use im-config to view the input-method configuration. Click Yes to configure it manually, select Enable fcitx Input Method, and then continue to the next step.
After restarting the computer, press Ctrl+Space to bring up the input method.
Done!
- Second method (for systems whose default language is English)
First uninstall ibus, then reinstall ibus and ibus-pinyin, because I found that ibus-pinyin had problems when I did not remove the original ibus first. The commands are as follows:
apt-get remove ibus  # 卸载掉原来的ibus
apt-get clean # 清空缓存
apt-get install ibus # 重新安装ibus
apt-get install ibus-pinyin # 重新安装ibus-pinyin
Then add an input source under Region&Language in Settings, add chinese(Pinyin), move it to the first position, and restart the computer. Shift can then switch to Chinese.
-
Move the Left Taskbar to the Bottom
Right-click the taskbar and change the taskbar position in Settings. Done!
-
Beautify the Terminal
Note: kali 2020.3 can switch directly to zsh. The command to switch is zsh, and the command to switch permanently is chsh -s /bin/zsh. Restart afterward.
A good-looking terminal is essential for that geek aesthetic. Here is how:
Run chsh -s /bin/zsh, then restart the computer. After opening the terminal, you will notice some changes.
Run echo $SHELL and see that it outputs /bin/zsh, but it still looks ugly. Do not panic.
Install oh-my-zsh next.
sh -c "$(wget https://raw.github.com/ohmyzsh/ohmyzsh/master/tools/install.sh -O -)"
If executing the command above reports that the connection was refused, refer to the following solution:
First, look up the IP address of the raw.githubusercontent.com domain. You can use https://site.ip138.com to look it up, as shown below:
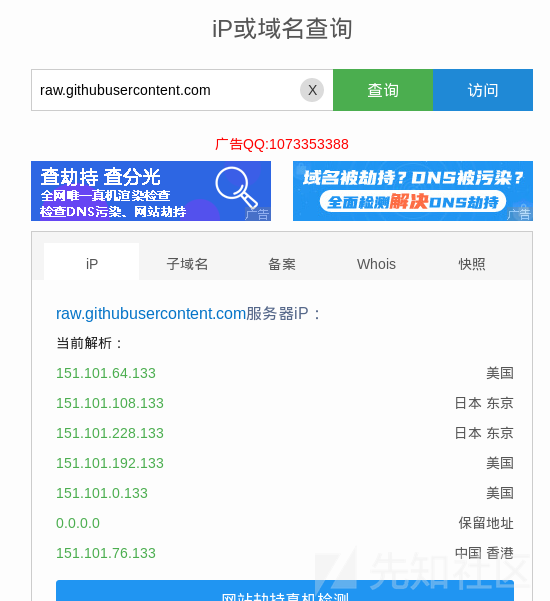
Next, choose any IP address and add it to /etc/hosts, as shown below:
sudo vim /etc/hosts
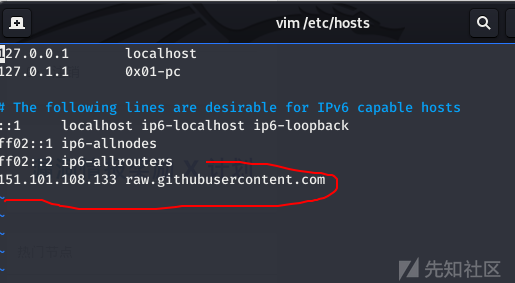
After saving and exiting, run the installation command again: sh -c "$(wget https://raw.github.com/ohmyzsh/ohmyzsh/master/tools/install.sh -O -)". It should work. I suspect DNS pollution was preventing the domain from resolving to the correct IP address, due to the firewall.
After the installation completes, the terminal looks like this:
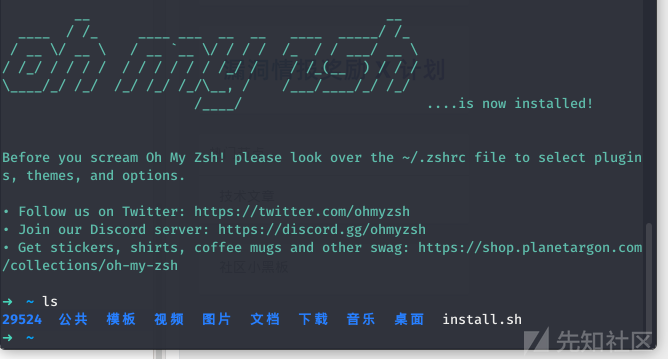
Okay, it looks a little better now. Continue.
The default theme does not look very good. We can see how many themes are available.
Run ls ~/.oh-my-zsh/themes to see many themes. The part before the zsh-theme suffix is the theme name. Remember it so you can use it to make the change later. For example, we will use the ys theme.
Open sudo vim ~/.zshrc, find the following line, and change it to the theme you want, as shown below:
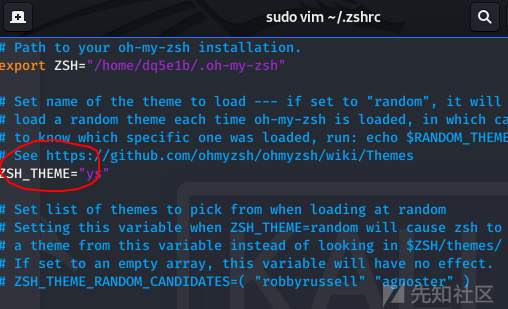
After saving and exiting, enter source .zshrc in the terminal to apply the configuration. The modified terminal is shown below:
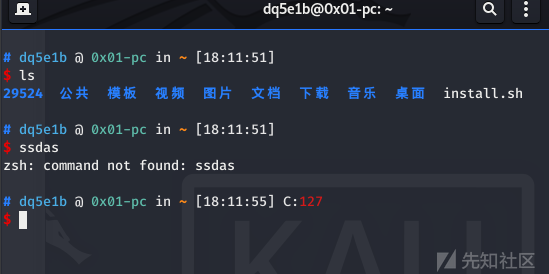
Test the other themes yourself and choose whichever one you like.
However, oh-my-zsh does more than make the terminal look good. It also includes some convenient plugins. View them with ls ~/.oh-my-zsh/plugins.
Here are a few recommendations:
z plugin: View directories that you previously entered. For example, if you previously entered /home/dq, you can use z followed by dq to enter the directory directly. Try this yourself.
extract plugin: A universal decompressor. Regardless of whether the compressed file is zip, tar, or another format, enter x 文件名 (where 文件名 means “filename”) to call the correct tool for decompression (provided that the corresponding decompression tool is installed).
How do you use plugins? Open sudo vim .zshrc, find the plugins option, add them, and then run source ~/.zshrc (because the plugins are bundled, there is no need to download them), as shown below:
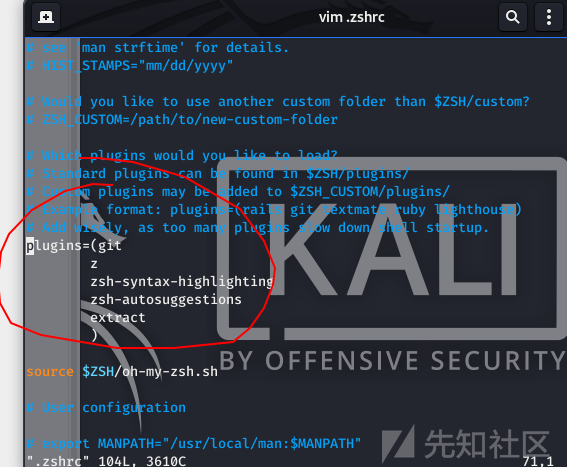
The two plugins above are included. Two other recommended plugins, zsh-syntax-highlighting and zsh-autosuggestions, must be downloaded separately with the following two commands:
git clone https://github.com/zsh-users/zsh-syntax-highlighting.git ${ZSH_CUSTOM:-~/.oh-my-zsh/custom}/plugins/zsh-syntax-highlighting
git clone git://github.com/zsh-users/zsh-autosuggestions $ZSH_CUSTOM/plugins/zsh-autosuggestions
Add these two plugins to the .zshrc file as well, then run source ~/.zshrc to use them.
Here is what these two plugins do: the first highlights valid commands and displays incorrect commands in red; the second records commands that you have run and shows them in gray as suggestions the next time you use them.
Done!
-
Configure Firewall Bypass (But Not Discussed Here, Because Teaching Others to Bypass the Firewall Is...)
-
Install Screenshot Software
sudo apt-get install flameshot
Then enter flameshot gui in the terminal to invoke the screenshot tool. But you cannot invoke it this way every time; that would be too troublesome. Set a keyboard shortcut in the same way as the terminal shortcut above.
Done!
-
Install phpstudy to Make It Easy to Switch Development Environments for Code Auditing and Other Tasks
Open the official phpstudy website. It provides a Linux download command. Because kail is based on Debian, use the following command:
sudo wget -O install.sh https://download.xp.cn/install.sh && sudo bash install.sh
After installation, you will see the webpanel stop message, meaning that the iweb control panel has encountered an error, as shown below:
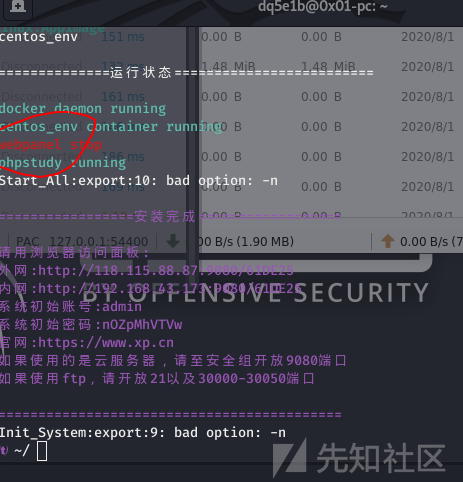
First use the xp command, namely sudo xp. The following options appear, as shown below:
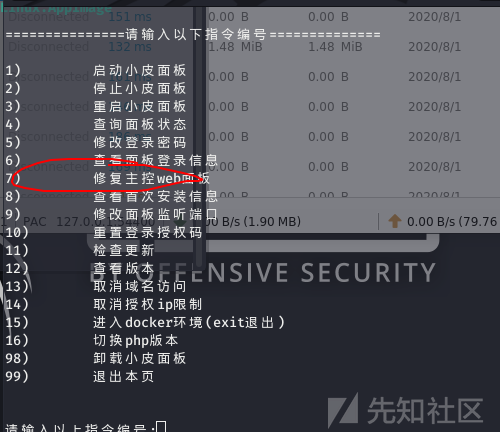
Enter number 7 to repair the webpanel.
There is another point that must be emphasized:
If you used zsh earlier to beautify the terminal, you will find that the web server software cannot start. This is because the virtual Docker environment does not have zsh.
This shell must be installed after entering the Docker environment. The server in the Docker environment is CentOS. The steps are as follows:
First, start phpstudy and then enter the Docker environment, using options 1 and 15 respectively.
Second, configure the Docker software repository (that is, configure the CentOS software repository).
Run vi /etc/yum.repos.d/CentOS-Base.repo. There is no vim editor in the Docker environment, so you can only use vi.
Clear the file and write the following content into it:
# CentOS-Base.repo
#
# The mirror system uses the connecting IP address of the client and the
# update status of each mirror to pick mirrors that are updated to and
# geographically close to the client.  You should use this for CentOS updates
# unless you are manually picking other mirrors.
#
# If the mirrorlist= does not work for you, as a fall back you can try the
# remarked out baseurl= line instead.
#
#

[base]
name=CentOS-$releasever - Base
baseurl=https://mirrors.tuna.tsinghua.edu.cn/centos/$releasever/os/$basearch/
#mirrorlist=http://mirrorlist.centos.org/?release=$releasever&arch=$basearch&repo=os
gpgcheck=1
gpgkey=file:///etc/pki/rpm-gpg/RPM-GPG-KEY-CentOS-7

#released updates
[updates]
name=CentOS-$releasever - Updates
baseurl=https://mirrors.tuna.tsinghua.edu.cn/centos/$releasever/updates/$basearch/
#mirrorlist=http://mirrorlist.centos.org/?release=$releasever&arch=$basearch&repo=updates
gpgcheck=1
gpgkey=file:///etc/pki/rpm-gpg/RPM-GPG-KEY-CentOS-7

#additional packages that may be useful
[extras]
name=CentOS-$releasever - Extras
baseurl=https://mirrors.tuna.tsinghua.edu.cn/centos/$releasever/extras/$basearch/
#mirrorlist=http://mirrorlist.centos.org/?release=$releasever&arch=$basearch&repo=extras
gpgcheck=1
gpgkey=file:///etc/pki/rpm-gpg/RPM-GPG-KEY-CentOS-7

#additional packages that extend functionality of existing packages
[centosplus]
name=CentOS-$releasever - Plus
baseurl=https://mirrors.tuna.tsinghua.edu.cn/centos/$releasever/centosplus/$basearch/
#mirrorlist=http://mirrorlist.centos.org/?release=$releasever&arch=$basearch&repo=centosplus
gpgcheck=1
enabled=0
gpgkey=file:///etc/pki/rpm-gpg/RPM-GPG-KEY-CentOS-7
Then clear the cache.
yum clean all Clear all yum caches on the system
yum makecache Generate the yum cache
Third, download zsh with yum install zsh.
That is it. Exit the container and restart phpstudy; it will return to normal.
Done!
-
Install the chrome Browser
Both chrome and firefox are essential browsers. I prefer chrome for development and firefox for penetration testing because it has more plugins.
First download the chrome package: sudo wget https://dl.google.com/linux/direct/google-chrome-stable_current_amd64.deb
Then install gdebi, which can automatically download all dependencies.
sudo apt-get install gdebi
Then use gdebi google-chrome-stable_current_amd64.deb to install the package that was just downloaded.
Once the chrome package is installed, you can find the chrome browser in Applications.
Done!
-
Install Baidu Netdisk
Go directly to the official website to download the .deb package, then use dpkg -i the downloaded package to install it.
-
Install a markdown Client
For the markdown client, use atom. It requires bypassing the firewall. After downloading the .deb package from the official website,
Run sudo dpkg -i 下载的包 (where 下载的包 means “the downloaded package”) to install it. However,
dependency problems will occur during installation. Run sudo apt-get -f install to install
the relevant dependencies, then reinstall it.
For instructions on using markdown, see this link.
-
Use proxychains to Proxy Application Network Traffic
kali includes the proxychains command-line tool. If it is not installed, download it.
The download command is: sudo apt-get install proxychains.
Then configure the /etc/proxychains.conf file according to your proxy port.
Here I changed socks4 127.0.0.1 9095 to
my proxy protocol and port. After saving, start the application with the proxychains command,
and proxychains will take over the application's network traffic by default.
-
Configure the Laravel Homestead Environment (For Reference if You Need to Develop with the Laravel Framework)
- Install vagrant. Download the .deb package from the official website, then run
sudo dpkg -i 下载的包(where下载的包means “the downloaded package”) to install it so that it can be invoked from the command line. Official website:https://www.vagrantup.com/downloads.html - Install vulturalbox. This has quite a few pitfalls involving kernel and dependency problems.
First, install virtualbox using the official method. The official address is:
https://www.kali.org/docs/virtualization/install-virtualbox-kali-host/If you find that a dependency is missing after installation, runsudo apt-get -f installto install the relevant dependency libraries. Next comes the kernel problem. Enterapt-get install linux-headers-$(uname -r)on the command line to install them. I found that the repository did not contain them, so go to this website to download them:http://http.kali.org/kali/pool/main/l/linux/. Find the corresponding .deb package in the prompt and download it. During installation, you will be told that this package requires another package. Return to the website just mentioned and find it. You may have to download four packages back and forth before the installation succeeds. Finally, install the virtual-dkms package withsudo apt-get install virtualbox-dkms, and at the very end, restart the computer, and that is it! Now virtualbox and vagrant are both installed. Next, install homestead by entering the following command:vagrant box add laravel/homestead. However, downloads are too slow in China. If possible, use use proxychains to download through a proxy, or copy the link into Xunlei and use the proxy to download it. Either way, bypassing the firewall is required. After the download completes, I used Xunlei with a proxy. The downloaded filename may appear as an encrypted string; that is fine—rename the file to homestead.box, then add it to vagrant with the following command:vagrant box add laravel/homestead homestead.box. After adding it, entervagrant box list. If you see the image below, it was added successfully! Then clone the Homestead repository locally withgit clone https://github.com/laravel/homestead.git. Enter the cloned repository directory and runbash init.sh. Then configure the key. Runssh-keygen -t rsa -C "[email protected]to generate a key. Next, configure the Homestead.yaml file. Under folders, to is the virtual machine directory and map is the local directory. The two directories map to each other, which means that changes in this virtual machine directory are synchronized with the local directory. Accordingly, create the directories specified in the configuration file. The IP on the first line of the configuration file corresponds to the domains under sites, and the domain's home page corresponds to the index.php file in the public directory of the virtual machine. Therefore, add the IP corresponding to the domain to the /etc/hosts file. Runsudo vim /etc/hostsand add the domain and its corresponding IP. There is one more important point: because we downloaded the box ourselves, we need to modify a configuration file. Enter the scripts directory inside the homestead directory and change the option in homestead.rb toconfig.vm.box_version = settings["version"] ||= ">= 0". After saving, enter the homestead directory and start the virtual machine withvagrant up. Then enter the virtual machine. We need to install a laravel project. Runvagrant sshto enter the virtual machine. By default, we are in the /home/vagrant directory inside the virtual machine. Then enter the code directory and create a laravel project by runninglaravel new blog. After creation, we find that an additional blog directory exists in the middle, so modify the Homestead.yaml directory mapping to make it correspond. Then runvagrant provision(run this every time the configuration file is modified). Finally, enter the domain in a browser and it is accessible. Mission accomplished!
-
Install LibraceOffice
Why install it? This allows us to open files such as word and ppt documents. It is similar to Microsoft's office, but this
software is free and open source, so we use it.
Find it on the official website, download it, and extract it. See the official documentation for installation. Here is a link to the official documentation:
https://libre-software.net/how-to-install-libreoffice-on-ubuntu-linux-mint/
-
Install NetEase Cloud Music
Download the .deb package directly from the official website, but remember to choose the ubuntu version rather than the deepin version; otherwise, there will be a dependency error and the dependency cannot be found. Once you find the ubuntu version, download and extract it, and it is ready to use.